When you click on links to various merchants on this site and make a purchase, this can result in this site earning a commission. Affiliate programs and affiliations include, but are not limited to, the eBay Partner Network.
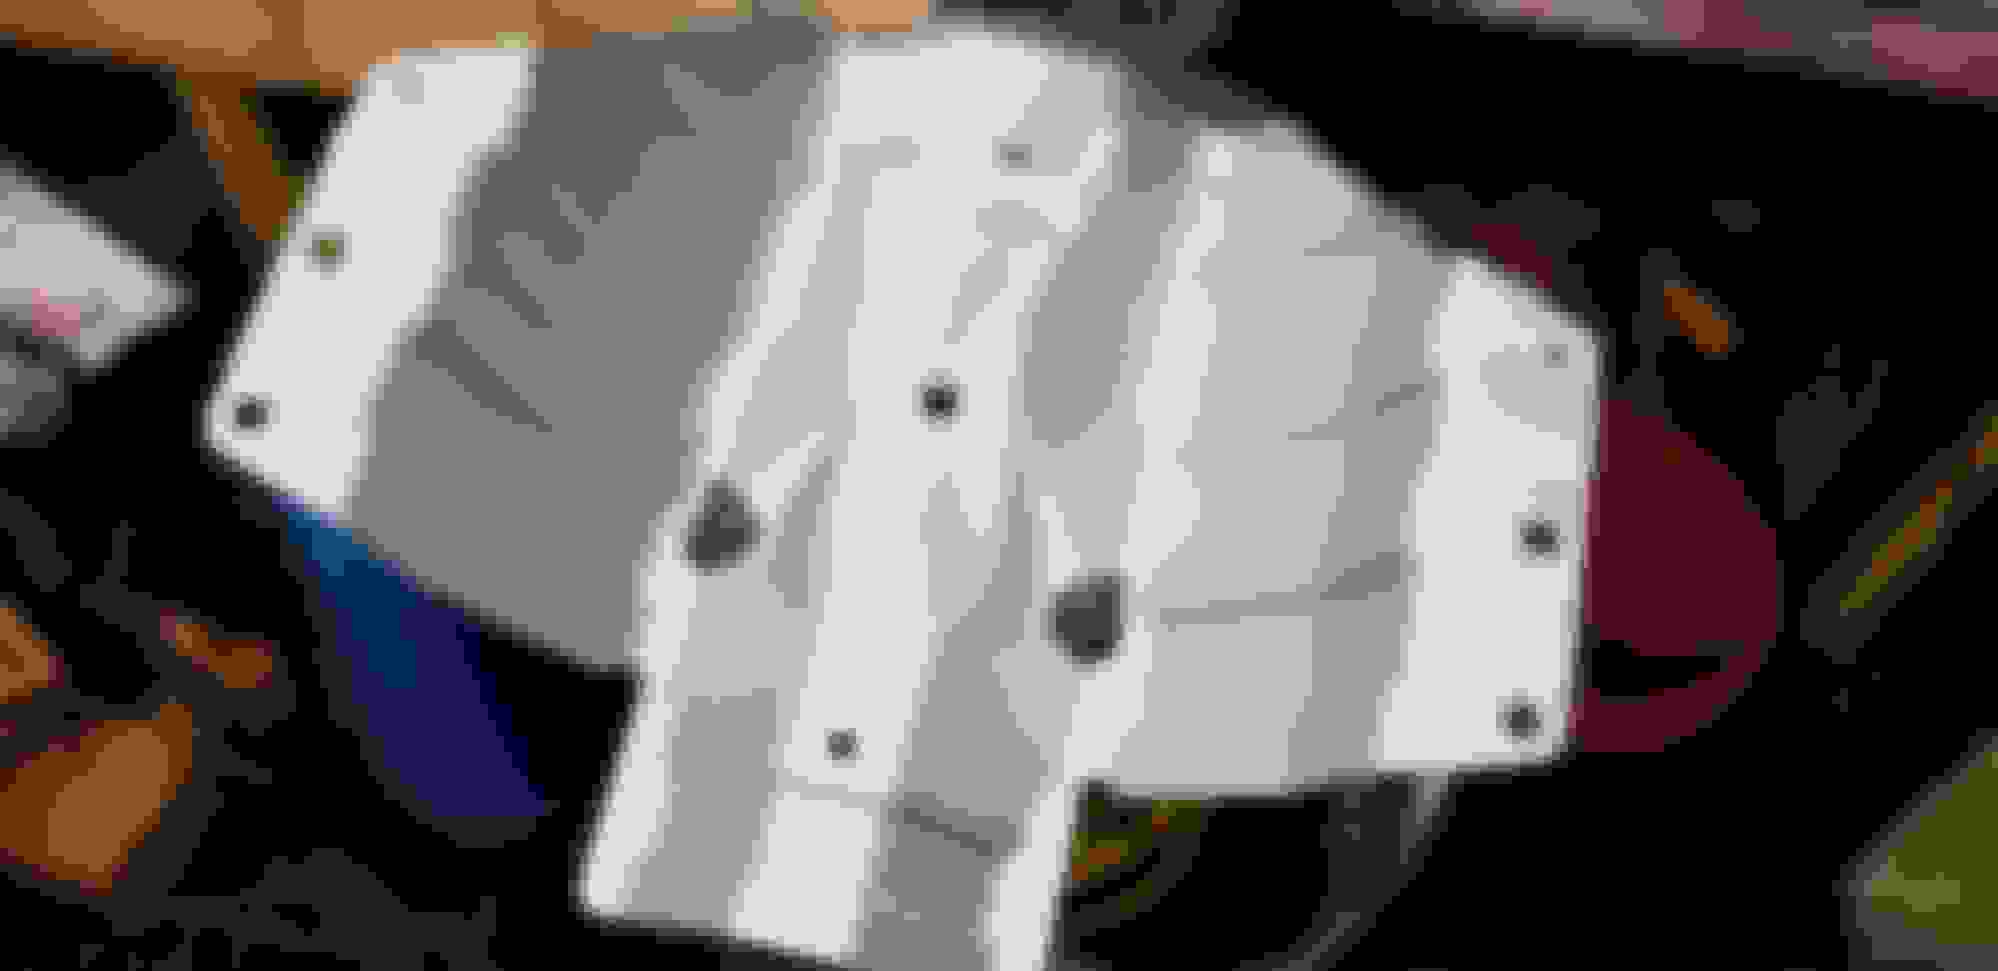
Tried to polish this aluminum heat shield, but it's already too pitted or corroded to be perfect, so got some 2k engine primer and a white gold color and clear that I'll treat all 5 pieces with.
All three are two part, you pop the catalyst inside the spray can and then you have like 48 hrs to use them.
I'll take this a step backward roughening it with scotchbrite pad and some prep etch.
They shoot a sample into the cap, not totally mixed, but gives an idea of the color.
I drilled out the rivets, removing the tabs/brackets which I'll paint separately, to paint it thoroughly.
Replacement rivets.
There are two shields above the cats against the underbody, and one above the muffler not shown.
This one is steel and had done weeks ago with high temp heat cure paint in stainless steel. I don't really think these shields need any extreme heat resistant paint much over 250 degrees so the 2k paints should be fine. The primer is engine rated to 650 though.
Just when I thought I couldn't be more impressed... looks amazing, if you ever sell your car it will be a very lucky person who buys it.
make sure you coat the splines and the flange face of the axles on reassembly really well with that molly grease , there was TSB from years ago because they would start clicking and the dealers had to add more moly grease to quiet them down...
regarding clocking the driveshaft, you only need to do that if there is any vibration when you reassemble, there shouldn't be though if you reassemble at the original orientation
Thanks for the advice, I wasn't sure about using it on the spline, I do have fluid film, I can use on some things. I have the 'S' model with VLSD and don't know of all models if that was more or less contributive of the problem.
I wasn't sure if the oem cotter pins were stainless, so got some and custom cut one leg to match, the heads are larger though. They are slightly thinner diameter also but should work. These show are 5/32, but later got 3/16 which are perfect.
There are belleville style spring lock washers under the big rear axle nuts, that I forgot which way they go, but found there is a ring of blue paint on one side of them that goes facing the hub, the outside rim of the washer contacts the hub, and the hub nut presses the inside of the washer on the outside or wheel side.
I made tiny matching marks with a center punch on each side of all drivetrain joints to reassemble it just like it was. I know you're supposed to use paint to mark, but since I was painting the parts, I choose to physically mark them.
Ialso found a threadlock called Vibra Tite VC3, that you coat and let dry, it is red like the original stuff on the various drivetrain bolts, is high strength, but does not harden and can be disassembled without heat. Good for vibration.
Last edited by Justin Bailey; 11-16-2018 at 01:04 PM.
Before this got too rusty, thought I'd pull it, clean it, and silicone grease the rubber to prevent dry rot, polish it up, then never seize and replace, it was a tough job, tried at first with a 1/2" rod but that wasn't strong enough, had to enlarge the hole about a half mm in diameter to fit a 5/8 rod through. I can wrap some stainless steel foil tape around the diff stud shoulder to take up the play later, or a 1/2" copper drinking water pipe will fit perfectly if I can find some and cut a short ring. Once the nut is torqued down, it should be rigidly fixed to the inside of the bushing, I expect.
Tried pulling out the back, but had to reverse because the rusted end was the front side, so I wasn't trying to drag the rusted end all the way through. Once reoriented to pull forward, it cracked loose, then with more tightening and more successive cracks it was moved farther and farther. I added more spacers to reach all the way through and eventually pulled it out. Had to custom grind a washer from a steel plate that would push the outside firmly enough, yet not slip inside the bushing.
Z1 makes a puller, and had a larger, stronger, acme threaded rod, but is designed to destroy the inside first then pull the outside, so no good if you're trying to preserve this.
I used a 5/8" threaded rod from a truck brake chamber (grade 8), an iron pipe floor flange, some stacked washers, even a wood spacer, and some 1/2" wall 4.5" OD aluminum tube pieces to land outside the housing, to fashion a puller.
The fancy aluminum piece was from when I experimented making a crank pulley wrench where the prongs would engage the pulley spokes, but that was from another car years ago and never came to fruition. I was going to bolt or have it welded to a leverage arm, but whatever, hehe.
I roll pinned this nut in 3 places to the end, making it like a bolt head.
Last edited by Justin Bailey; 11-16-2018 at 01:14 PM.
Going to paint the front axle rusty CV housings too, but here is my improvised method to hold the hub and loosen the nut when there are no wheels on the ground and since the front transaxle and final drive will just freewheel.
Had a few old lug nuts, used one and a 7/8" wrench with a cheater wrench, and a block, wasn't sue if this would work but it did, the stud seemed strong enough, was going to rest the wrench on a second nut / stud but it rode againt the hub socket just fine.
This was an old nipper or crimper, that was about 3/4" wide that I hacksawed and ground narrow and undercut/ filed the teeth to make it into a push pin pliers.
Yeah so I can't stand rust, what can I say, here are the front axles out, hubs separated from the knuckles too, goin' to dress it all up real nice what the heck.
The right / passenger side came out by prying the C-clip end, was not sure how it would pass through the strut fork so took it away, along with the knuckle and hub.
Didn't want to mark them up trying to punch the hub tabs in a circular way to loosen them like I've seen air hammers used to do, so I just set them down on the floor and a bit of wood between the shield and bottom side, then I used a wood peice as a drift, soaked a bit of penetrant first, but not too much trouble then. Picture shows the bolts still in- had only loosened them earlier.
The driver side had small bolts that were stubbornly tight to me, actually broke the only 6 point thing I had which was a 1/4 drive, need to get a 6 point 10mm wrench rather. I was able to remove 3 easy-to-loosen, retainer bolts and take the side shaft extension tube out all together.
Now I can work on getting a wrench or think of how to get them on the bench especially in the vise. I could put back the side shaft and retainer first separately, but may not since it's so much easier to tighten these here. Thinking about getting titanium for these so you can't round off the heads since it is such a hard metal. Original is a double drive - there are 5mm Allen sockets inside the 10mm hex, I can get the same thing in Ti. Did not try that, I think they will just round out, going to try the heat gun and some more blaster.
update: used heat air gun to warm them up then a regular 12 point wrench with a cheater got them loose. Ordered 6 new oem nissan ones $1.73 a piece. The titanium ones I was browsing would have been nice but too much money I could not see spending.
Last edited by Justin Bailey; 11-05-2018 at 03:10 AM.
update: used heat air gun to warm them up then a regular 12 point wrench with a cheater got them loose. Ordered 6 new oem nissan ones $1.73 a piece. The titanium ones I was browsing would have been nice but too much money I could not see spending.
Good job on getting that driver's side shaft off, I've done the passenger side before and it just popped out with a pry bar, but I've read a couple of other accounts on here of how difficult the Drivers side was because of those bolts...coincidentally I was just under my G this weekend and saw my Drivers side axle is trashed so I'm gonna be pulling replacing it too..you don't happen to have the part numbers for the bolts handy lol? gotta order some parts
Good job on getting that driver's side shaft off, I've done the passenger side before and it just popped out with a pry bar, but I've read a couple of other accounts on here of how difficult the Drivers side was because of those bolts...coincidentally I was just under my G this weekend and saw my Drivers side axle is trashed so I'm gonna be pulling replacing it too..you don't happen to have the part numbers for the bolts handy lol? gotta order some parts
39106-AL81A got mine from Tasca Parts in RI, they have paypal, it's handy.
I am pretty sure it is necessary to at least remove the strut fork end. I had my whole knuckle off as well, maybe that could be turned to the side if the tie rod is disconnected idk. It passed by the engine mount, and remember I also have no air intake, coolant pipe, manifold, or cat in the way so I could reach the retainer bolts very easily, not sure what to say about the clearance to reach them when all of that is there, best thing could be to get a 10mm 6 point little wrench or a long pattern wrench, but even with the long pattern you may need a cheater wrench on it. The thing with getting the 6 screws on the car also is holding the shaft from turning in order to loosen them. I can definitely see problems trying to, but maybe loosen those before disassembling the suspension either with the wheel on or something blocking the studs to stop it from turning, then tighten it last after everything is back together.
I found that either an electrical tape pack blister or a cap off of the large size easy off oven cleaner or spray adhesive cans have a larger cap that can be trimmed to make a temporary cap tight enough to wash around it, but just to keep dust out, regular paint can caps fit ok too in the opening.
Last edited by Justin Bailey; 11-05-2018 at 05:39 PM.
39106-AL81A got mine from Tasca Parts in RI, they have paypal, it's handy.
I am pretty sure it is necessary to at least remove the strut fork end. I had my whole knuckle off as well, maybe that could be turned to the side if the tie rod is disconnected idk. It passed by the engine mount, and remember I also have no air intake, coolant pipe, manifold, or cat in the way so I could reach the retainer bolts very easily, not sure what to say about the clearance to reach them when all of that is there, best thing could be to get a 10mm 6 point little wrench or a long pattern wrench, but even with the long pattern you may need a cheater wrench on it. The thing with getting the 6 screws on the car also is holding the shaft from turning in order to loosen them. I can definitely see problems trying to, but maybe loosen those before disassembling the suspension either with the wheel on or something blocking the studs to stop it from turning, then tighten it last after everything is back together.
I found that either an electrical tape pack blister or a cap off of the large size easy off oven cleaner or spray adhesive cans have a larger cap that can be trimmed to make a temporary cap tight enough to wash around it, but just to keep dust out, regular paint can caps fit ok too in the opening.
Good tips, especially on the issue with keeping the axle from turning...I wouldn't have thought about it at all till it was too late...I was just gonna release the knuckle from the top, take the bearing out; release the outer tie rod and remove the strut mounting bolts (top and bottom)...but I think I'll try to go in from underneath on ramps first to loosen the 6 bolts and then switch to jack stands and take everything apart...I was able to spray the 6 bolts with pb blaster on the weekend with just the under tray off up on ramps...I was hoping a 10mm socket on a slim head long ratchet would work, but may have to try the 10mil wrench with the cheater or a crows foot will have to do
Did the same brass brushing on the spline area, with the phosphoric naval jelly, it's almost like brush plating.
The prep process kind of removes the nice anti corosion from the studs, but I'll give them an extremely faint smear on the threads with the galvanized color, it gets harder that soft metals. Don't see any difference between L or R side, but marked the stud ends with blue and red markers.
I just lost the previous hour at work to reading this thread. It is just awesome. Im only on page 2 but i must say it is a pleasure to witness the value and care you are giving these parts. It is something I dream of doing, but will never. It is reminiscent of a time prior to the disposable culture we have today. Bravo sir. Cant wait to read the rest of this thread!
Thank you, glad to hear people are enjoying this, it's encouraging to my perseverance, hehe.
I really like the g37 body style, I hope to keep the car a long time, I park it outside and don't drive it much, hope it preserves it. I ordered some Alodine 1001 aluminum conversion treatment to try and fend off corosion ( mostly cosmetic ) from showing age. It is a higher quality prep for paint on aluminum than the zinc phosphate rust blast I believe.
Tried to get a contrast between the cast and machined areas on the hubs. Tiny detail brushing. At first I lightly coated the disc matting surface, then thought about disc run out, so brake clean and scrubbed it off of that area before it hardened fully, probably best. I'll just spray fluid film there when I put the rotor back on.
Going to try this pigment into some por-15 clear, (kbs doesn't offer a rust seal clear), and half silver mix, on whatever engine areas I can reach. Kind of will match the manifolds or at least be complimentary. May do transmission in flat silver galvanized or both the same. These coatings are super tough and it doesn't take much thickness to protect and appear nicely also adheres/ covers well. Also though if there is enough gold 2k, that I would mask and spray the pans with the primer, color, & 2k clear.
Last edited by Justin Bailey; 11-07-2018 at 05:51 PM.
I'm in the Northeast and only have 18k on my q40 and don't drive much either. The rust is already getting significant. I've made a feeble at sanding and applying some paint on the underbody. Nothing close to your efforts!

 11-02-2018, 01:39 AM