When you click on links to various merchants on this site and make a purchase, this can result in this site earning a commission. Affiliate programs and affiliations include, but are not limited to, the eBay Partner Network.
G37 Coupe upper control arms on my G35/7 Sedan. Got me around +2 degrees of camber (gained)
I have a 2007 G35 sedan (V36 body). This the pretty much the G37 sedans too. So this information would be useful for G37 sedans as well.
Years back I replaced one of my upper control arms (UCA) with a coupe�s UCA. I noticed that the coupe�s UCA gave my car some positive camber. My sedan was at stock height at this time, so the additional positive camber wasn�t necessary. I put a sedan UCA back on, since I didn�t need the extra positive camber at the moment.
Fast forward to this year. I lowered my sedan a little over 1�, probably like 1.2 -1.4� lower. My fronts currently measure 27� (fender to floor). The car inevitably got some negative camber.
So I thought: Replace the sedan UCAs with the coupe�s UCAs, to perhaps gain some positive camber back into the fronts...for relatively cheap. I got a pair of the coupe UCA for $60.
Using the G37 coupe arms will be great too, as they will retain the aluminum feature of the double wish-bone suspension. (unsprung mass you know)
Yes, I checked before doing all of this. They are different Part Numbers
54524-JL00C upper right Coupe (G37 and 370Z)
54525-JL00C upper left Coupe (G37 and 370Z)
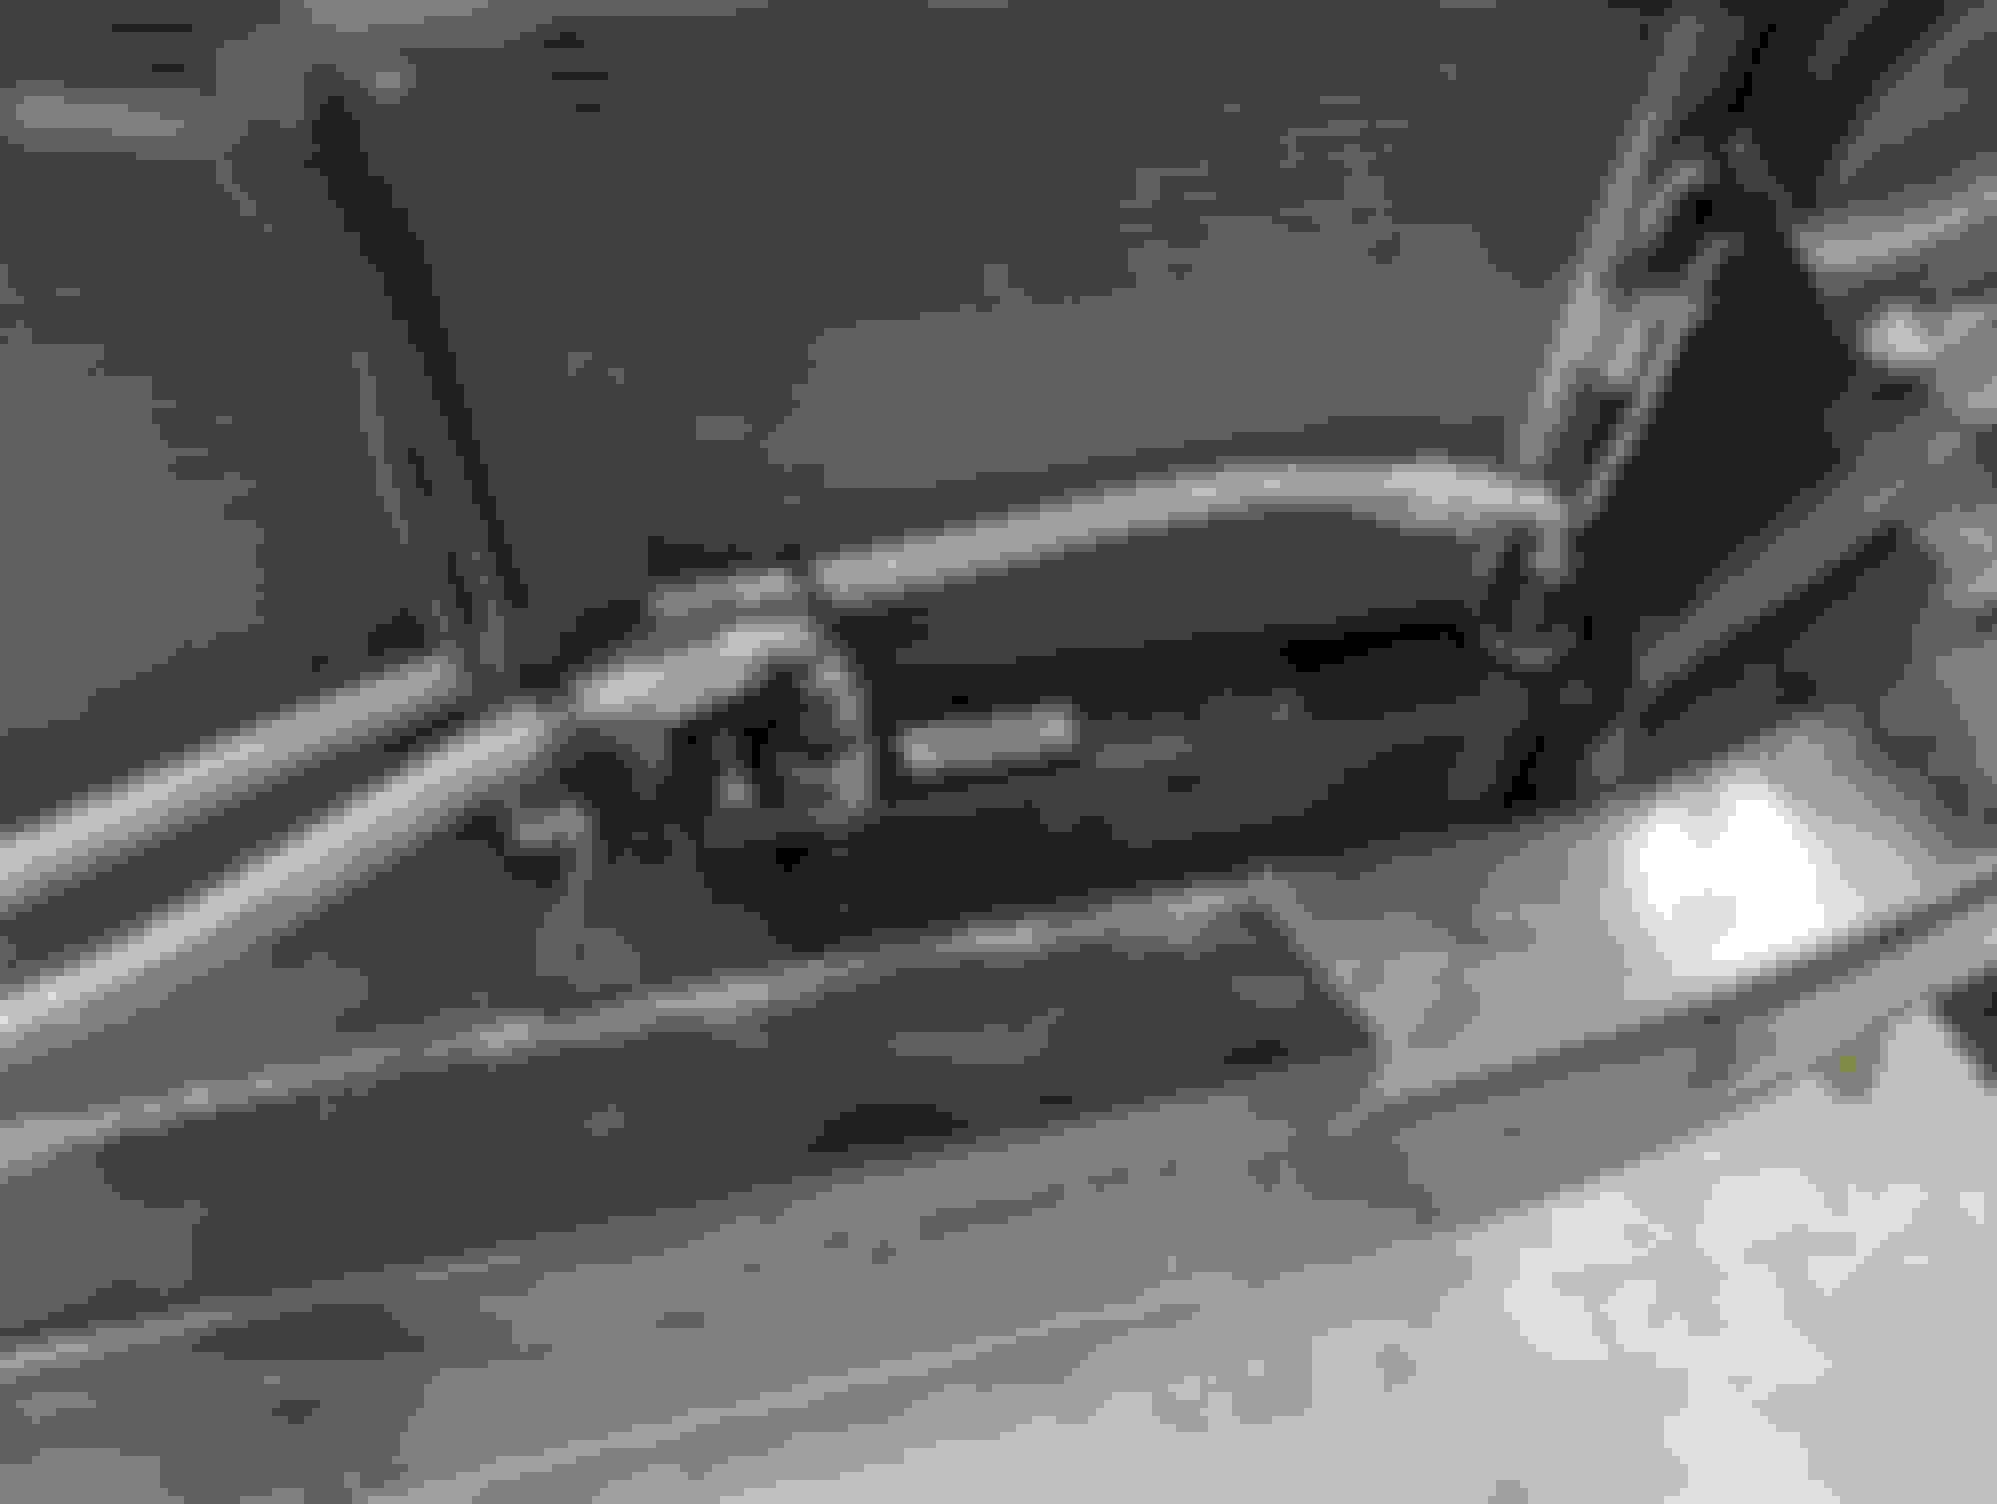
Once I got one side off. I lined up the back bolt holes as best as I could, and you can see that the front ball joints are longer on the coupe compare with the sedan. Coupe is on top
Concerns I had:
Will the coupe�s UCA affect caster?
Will the coupe�s UCA clear the Sedan body?
Can toe still be adjusted back to specs?
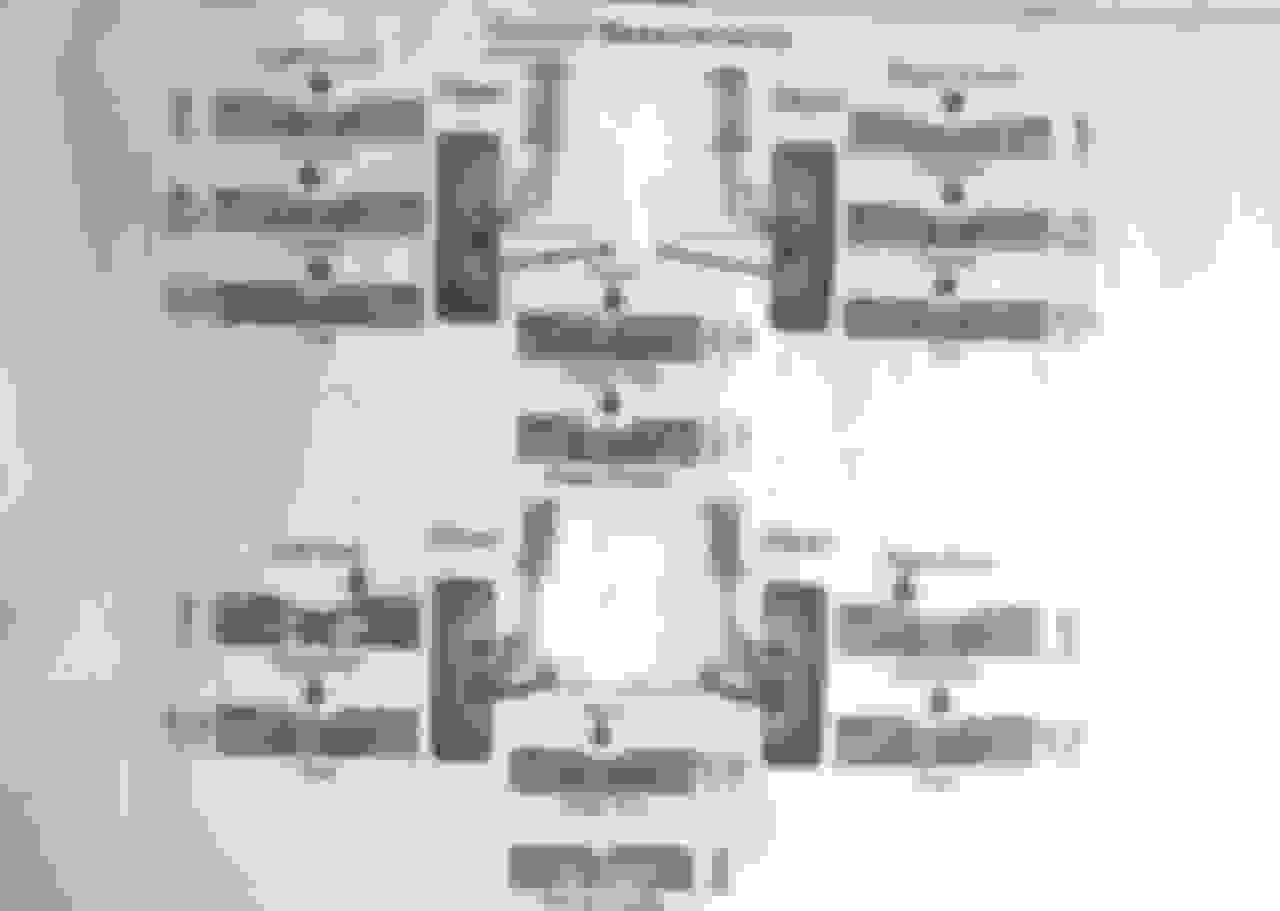
I bought an amazon DIY gauge to get my �before� and �after�. Joke all you want. But this is just to help me get a before measurement and an after measurement. The difference between the two is the key information I�m going after.
With the DIY gauge:
�Before� measurement with Sedan UCA is -2.75 degrees (left picture)
�After� measurement with Coupe UCA is -0.75 degrees (right picture)
Both driver and passenger measured the same.
So -2.75 minus -0.75 -> gives us a total of 2 positive camber gained.
Great. But now I have to answer the concerns listed above. Took the car to get an alignment, and I�m glad to say that caster is in spec, toe can still be adjusted back to spec, and camber is in spec. And I have driven the car through speed bumps, did U-turns, etc. The coupe�s UCAs clear the sedan body.
The Shop�s alignment rack measures my front camber at -0.4 and -0.3 (via picture). So if we used the +2 camber value that I calculated at home, we can say that I initially had -2.4 and -2.3 camber to begin with.
In conclusion, you can use the G37 coupe/370z upper control arms on a Sedan, in order to gain around 2 degrees positive. Plus or minus some for margin-of-error.
Considering that Infiniti�s front camber Spec�s have a window of -1.1 to +0.4 degrees. That is a pretty large window. So If the coupe UCAs can get you back into that window. Maybe this could save you some money.
Hopes this helps. This has been on my mind for the past 3 years. And I�m happy to have prepared this for the community.
As someone who discovers random **** and decides to obsessively calculate the process and obtain amazing results I have to congratulate you on the job well done.
Funny thing is this is a common trick on some older suspensions however I dont think that ANYONE would have guessed the UCA would be any different. I mean 3/4 of the suspension is the same and these bars look exactly the same
.
You measured, tried, obtained data on your own and lastly confirmed with the alignment rack.
I will be using this trick pretty soon. Thanks again!!!!
Really cool info I found today which was the diagnostic menu.
I found I can reset my steering angle sensor through the infotainment system as well as access the rear camera while the vehicle is in motion.
@BULL , Friendly advice: Whatever you do in that diagnostic menu, DO NOT EVER press the option to RESET USET/ SYSTEM INITIALIZATION:
Doing so WILL ERASE your AV system and render it useless. Only CONSULT3 can reprogram the unit.
Many folks have pressed that option, and learned the hard way...
@BULL , Friendly advice: Whatever you do in that diagnostic menu, DO NOT EVER press the option to RESET USET/ SYSTEM INITIALIZATION:
Doing so WILL ERASE your AV system and render it useless. Only CONSULT3 can reprogram the unit.
Many folks have pressed that option, and learned the hard way...
And to know I was a touch away from total Brickzation
Great info on the diagnostics screen. Although that warning makes me not want to even look, LOL.
BULL, what the heck is up with your dash plastics? How does that even happen?
The plastics were painted. I take it you mean the actual dash?
It's the best attempt at melting recovery, it looked like the Grand Canyon, almost everything that you see rough was cracked and exposing the yellow foam.
Possibly going to stay like that until the outside is looking proper again.
As someone who discovers random **** and decides to obsessively calculate the process and obtain amazing results I have to congratulate you on the job well done.
Funny thing is this is a common trick on some older suspensions however I dont think that ANYONE would have guessed the UCA would be any different. I mean 3/4 of the suspension is the same and these bars look exactly the same
.
You measured, tried, obtained data on your own and lastly confirmed with the alignment rack.
I will be using this trick pretty soon. Thanks again!!!!
Did an Oil and Filter change and installed 25 row cooler. The mocal plate has a 180F thermostat but we shall see if I need to block it off. Slowly getting my car ready for a track day, suspension is next
Not to put salt in the wound but if it looks like that now, what did it look like before?? Geeesh How does that even happen?
Pretty much a crack all the way down to the yellow in any part you see that roughness, missing chunks and all. At the time finding a dash between my budget was just not going to happen so this was the result.
I have pictures of the before in my members ride.
Pretty much a crack all the way down to the yellow in any part you see that roughness, missing chunks and all. At the time finding a dash between my budget was just not going to happen so this was the result.
I have pictures of the before in my members ride.
I started putting black E6000 into my cracks in the dash it's a little glossy but looks a hell of a lot better than yellow foam.
I had a big chunk fall off by my knee which looks terrible the repair makes it look a bit more hidden heh
I started putting black E6000 into my cracks in the dash it's a little glossy but looks a hell of a lot better than yellow foam.
I had a big chunk fall off by my knee which looks terrible the repair makes it look a bit more hidden heh
JB black silicone dries fantastic and leaves a semi gloss finish. Fantastic for even the deepest gouges however not when the entire dash looks like it's had children.
That's kind of what I tried doing, somewhat of a coat and then went over it with a card, wet rags, pics, etc. That was pretty much the best I was able to do, it sucks because repairing dashboards are kind of a one time thing.
 10-26-2022, 12:10 PM


 How does that even happen?