When you click on links to various merchants on this site and make a purchase, this can result in this site earning a commission. Affiliate programs and affiliations include, but are not limited to, the eBay Partner Network.
I found myself with a bit of free time over the weekend so I did a DIY Midnight Black grill. Not perfect but only took a couple of hours and less than $20.
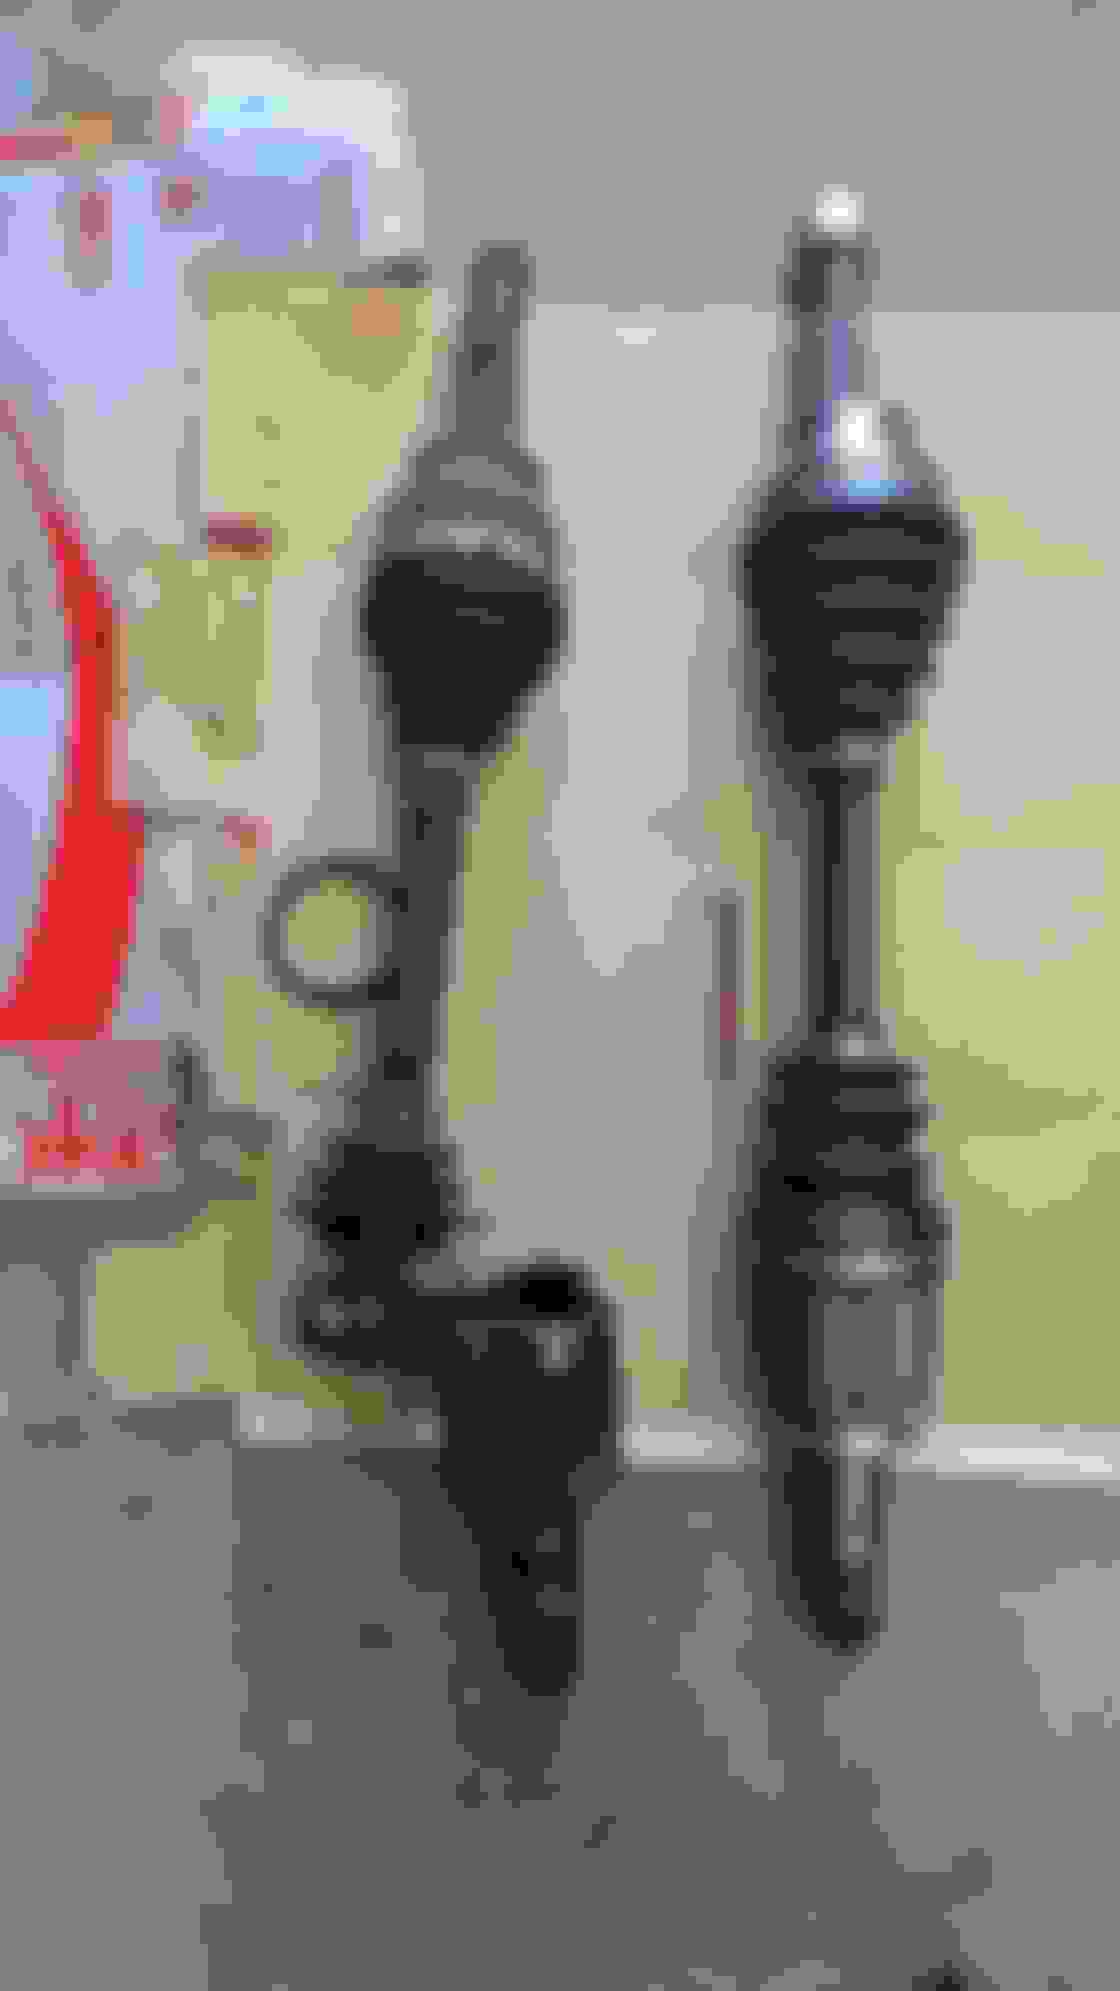
Last week I heard a noise from the front passenger corner and upon investigation the inner CV of that axle had completely failed. With no grease to be found in the CV, I parked the car until my replacement axle came in on Wednesday. Started swapping the axle Friday afternoon and to my surprise it went fairly smoothly. Took my time with it and it was less than 3.5 hours from start to finish. I also found the elusive Fuji badge from the engine cover. Axle fell out with the removal of the axle nut and upper control arm bolt. One of these is not like the other Found my Fuji from the engine cover!! Wonder how many years it's spent here. New axle in, toughest part was getting the strut back in over the axle and under the upper control arm. I may have saved some effort if I disconnected the sway bar but I was trying to do minimal disassembly. I know I can get a little happy with the hammer and prybar so I wrapped the calipers in foam as a precaution.
First, congratulations on a job well done and thank you for documenting w/ pictures. Inner joint failures are rare as they do not flex as much, compared to the outers which have a larger range of motion. This is why most inner joints use tripod spiders. Out of curiosity, what shape are the spiders in?
In all likelihood, you probably could have just repacked the housing with grease and installed a new boot. Either way, good job!
And the added bonus.... the Fuji. A few dabs of JB Weld and you won't ever have to worry about it popping off ever again. That is why I did to mine before I swapped out to the Nissan cover...
First, congratulations on a job well done and thank you for documenting w/ pictures. Inner joint failures are rare as they do not flex as much, compared to the outers which have a larger range of motion. This is why most inner joints use tripod spiders. Out of curiosity, what shape are the spiders in?
In all likelihood, you probably could have just repacked the housing with grease and installed a new boot. Either way, good job!
.
Thank you! Your assumption is correct, everything is in decent shape and could be repacked. However I know how messy that can be form previous experience so I elected to buy a new axle as it wasn't much more expensive. I image the failure was due to improper installation (the previous axle had less than 30k miles) probably tearing the boot during the last replacement, which was done by a tire shop under the previous ownership. With all that said I'll set the old axle aside and may rebuild it in the future. In all likelihood it will just live in my shed next to the S13 and S14 axles and differentials.
Messy is a understatement! I've rebuilt my fair share (and then some) of CV joints. Older GM's were the worst. I had a '75 Olds Toronado and a '78 ElDorado and those joints were a GD/MF/PITA/POS! (you'll figure it out) with cracked ball bearing cages and scarred races- not to mention constant blown boots!
Ah, the good old days...(man, I miss those old boats).
Last edited by ILM-NC G37S; 06-11-2022 at 01:43 PM.
For the passenger side all I had to do was disconnect the upper control arm from the knuckle and then completely remove the strut. I removed the ABS sensor and wiring so it wouldn't get caught on anything. I would suggest also taking off the sway bar end link, one less thing to fight. Luckily I didn't have to do anything with the brakes which I was thankful for as I just did a brake flush flush less than 2 months ago.
For the drivers side I've heard that can be much more of a pain.
Did you forget the castellated axle nut cover? I see the cotter pin, but I don't see it engaging with anything on the nut.
Since it's been in my possession, this car has not had the axle nut covers on the front axles. Somewhere in it's life they were lost. I should add them to my punch list.
For the first time in a few months, I finally had some free time for the car. Finished the metal reinforced epoxy prototype for this ****. It's 1.5 cm shorter than the first version and because of the material, very nice and heavy. Raw, before final filler. Base coat Clear coat Final Installed
Bought a sew in steering wheel cover for my spare wheel. Went ahead and took the old leather off for a cleaner less bulky look. Had my wife take on the sewing part since she's a beast.
Came to find out the thumb rest areas at 3 and 9 pm to just not cooperate so we halted it. I also seen that the perforated leather look on the sides just wasnt doing it for me so now I'm looking at full leather ones with better quality.
Any one in here have wrapped their own and taken the old leather off?
Im interested in how y'all sewed this area.
Absolutely crazy timing. I was just updating my build thread with my steering wheel wrap from Redline Goods. I did not take the old leather off but I do remember this area being an absolute pain to sew. It didn't help that it was July in TN and I was dripping with sweet.
Bought a sew in steering wheel cover for my spare wheel. Went ahead and took the old leather off for a cleaner less bulky look. Had my wife take on the sewing part since she's a beast.
Came to find out the thumb rest areas at 3 and 9 pm to just not cooperate so we halted it. I also seen that the perforated leather look on the sides just wasnt doing it for me so now I'm looking at full leather ones with better quality.
Any one in here have wrapped their own and taken the old leather off?
Im interested in how y'all sewed this area.
I've done 4, 2 with fake chinese "leather" and 2 with redlinegoods real leather. All went over the top of the original leather. The redlinegoods is a perfect fit. Use a bit of contact cement to hold everything into place. After a out 10-15 stitches, tightly wrap a piece of masking tape and keep moving around the wheel. The thumb areas should even and stretch themselves out once the tension is even across the board. I highly recommend redlinegoods. You can also get padding and slightly larger leather I'd you want to bulk it up, they also sell the kit that adds the thumb groves. You can also have them do the wheel for you, even make it flat bottom.
P.S. heating it with a steamer at the end helps the leather relax a bit and sit into place.
Great summary Hexotic, I wish I would have used a bit less contact cement. I have a couple of high spots in mine from the adhesive and it really aggravates my OCD.

 06-07-2022, 12:54 PM