
(Pic request)Trunk spoiler on blue slate sedan?


 05-13-2010, 10:52 PM
#20
Registered User

Join Date: Mar 2007
Location: boynton beach, fl
Posts: 71
Likes: 0
Received 0 Likes
on
0 Posts
1st off it does come painted for 110, this is my 2nd time buying from them, and like u said, to each his own. This is called the Euro spoiler, and to myself, looks much better then the stock OEM, which looks awesome if the car was a 2 door, but again doesnt get rid of your least favorite part, the chrome. I actually like the chrome, and this way keeps the look nice and clean and gives you a spoiler to boot!
05-14-2010, 04:17 PM
#22
Registered User
Thread Starter

Join Date: Apr 2009
Location: Houston, TX
Posts: 324
Likes: 0
Received 0 Likes
on
0 Posts
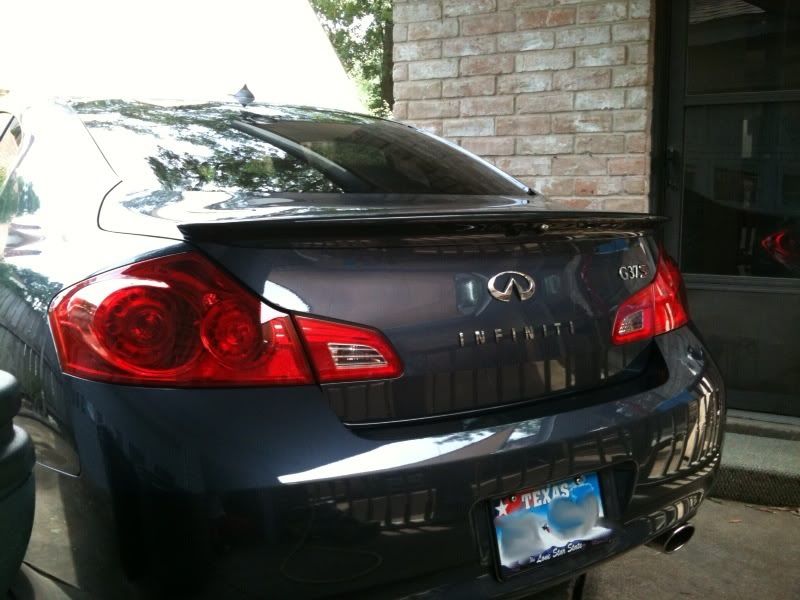
Just installed it. Here's a quick pic from my phone. It really doesn't look very good in my pic, or others I've seen. It looks much better in person.
It turned out to be a little more of a PITA to install than I thought it would be. Better directions would make it easier. It's a DIY that most people should be able to perform though. On to the next one.
It turned out to be a little more of a PITA to install than I thought it would be. Better directions would make it easier. It's a DIY that most people should be able to perform though. On to the next one.

 05-14-2010, 05:49 PM
#24

Just installed it. Here's a quick pic from my phone. It really doesn't look very good in my pic, or others I've seen. It looks much better in person.
It turned out to be a little more of a PITA to install than I thought it would be. Better directions would make it easier. It's a DIY that most people should be able to perform though. On to the next one.
It turned out to be a little more of a PITA to install than I thought it would be. Better directions would make it easier. It's a DIY that most people should be able to perform though. On to the next one.
How is the color match?
05-15-2010, 12:23 AM
#25
Registered User
Join Date: Mar 2007
Location: boynton beach, fl
Posts: 71
Likes: 0
Received 0 Likes
on
0 Posts
After the spoiler, the next will be to take off the INFINITI again and tint it up. That spoiler looks good, but I still prefer the Euro over it cause i like the Chrome under it. Good luck
05-15-2010, 09:47 AM
#26
Registered User
Thread Starter
Join Date: Apr 2009
Location: Houston, TX
Posts: 324
Likes: 0
Received 0 Likes
on
0 Posts
The trunk lid liner must be removed. Easy.
Unplug camera and trunk button wiring. Push grommets through.
Remove 4 nuts holding the chrome strip on.
Pop the chrome strip off(two clips still holding it there).
Remove the bracket from the chrome strip that is holding the backup camera and trunk button.
Remove the backup cam and trunk button from bracket.
Transfer both to the new bracket.
Attach new bracket to the new spoiler.
Put the 5 templates in their respective places. Center punch drill locations.
(Just a note about the templates. They are perfectly sized and cut. It is very easy to align these templates to get an the exact location to drill holes)
Drill out the 5 holes. After center punching, drill each hole using a 1/8" bit. Then open up the holes using a 5/16" bit. Debur holes. Apply rust preventative to edges of holes(I just used touch up paint).
Clean the area that will get double stick tape with alcohol/water.
Install spoiler using two plastic clips.
Align it properly and remove the two sided tape.
Install the 4 bolts that attach to the spoiler from inside the trunk lid.
Put the trunk lid liner back in. Your done.
Just take your time and double check everything. Mine came out great, perfectly aligned, no gaps.
05-15-2010, 05:34 PM
#27
The color match is perfect. I already threw away the directions, but I'll give a quick rundown of what's required:
The trunk lid liner must be removed. Easy.
Unplug camera and trunk button wiring. Push grommets through.
Remove 4 nuts holding the chrome strip on.
Pop the chrome strip off(two clips still holding it there).
Remove the bracket from the chrome strip that is holding the backup camera and trunk button.
Remove the backup cam and trunk button from bracket.
Transfer both to the new bracket.
Attach new bracket to the new spoiler.
Put the 5 templates in their respective places. Center punch drill locations.
(Just a note about the templates. They are perfectly sized and cut. It is very easy to align these templates to get an the exact location to drill holes)
Drill out the 5 holes. After center punching, drill each hole using a 1/8" bit. Then open up the holes using a 5/16" bit. Debur holes. Apply rust preventative to edges of holes(I just used touch up paint).
Clean the area that will get double stick tape with alcohol/water.
Install spoiler using two plastic clips.
Align it properly and remove the two sided tape.
Install the 4 bolts that attach to the spoiler from inside the trunk lid.
Put the trunk lid liner back in. Your done.
Just take your time and double check everything. Mine came out great, perfectly aligned, no gaps.
 05-17-2010, 04:54 PM
#29
Roof spoiler: BlackTop Aero Roof Spoiler For 07+ G35 Sedan (ABS) - Ravspeconline.com
Trunk spoiler: japanparts.com : PARTS DATABASE
05-18-2010, 06:24 PM
#30
Registered User

Join Date: Feb 2010
Location: NorCal
Posts: 464
Likes: 0
Received 0 Likes
on
0 Posts
Roof spoiler: BlackTop Aero Roof Spoiler For 07+ G35 Sedan (ABS) - Ravspeconline.com
Trunk spoiler: japanparts.com : PARTS DATABASE
Trunk spoiler: japanparts.com : PARTS DATABASE
BTW---nice work on the DIY trunk spoiler install. Looks good!