DIY: Convenient Battery Tender hookup
#1
Convenient Battery Tender hookup
I work from home so unfortunately my G spends most of its time in the garage. I was concerned about keeping the battery in good shape and ready to drive, so I asked Santa for a Deltran Battery Tender Plus and he graciously provided...
The Battery Tender Plus comes with a standard jumper-style cable and a "quick-connect" cable. I wanted to find a way to use the quick-connect cable to make using the Battery Tender as convenient as possible. This is what I came up with.

The cable is secured to the cowl cover by a pair of zip ties, so there's no permanent modification of the car's exterior. You do have to mangle some of the plastic in the battery compartment however. More on that later. The cable has an inline fuse to protect the battery and also has a weather-resistant rubber plug. It tucks up easily under the back of the hood and is not visible.
1. Disconnect the negative battery terminal and fully remove the 10 mm clamp nut and square headed bolt. Put a towel or something over the negative battery terminal to prevent accidental contact.
2. You will have to remove some material from the sides of the cable's negative ring terminal so it will fit in the clamp's channel under the bolt head. I used an end cutter to nip off a bit from each side.
3. Reassemble the clamp with the ring terminal in place on the bolt side, but do not attach it to the battery yet.
4. Remove the red plastic positive terminal cover and remove the 12 mm nut from the left harness terminal. Install the positive ring terminal sideways and reinstall the nut. The torque is 10 ft-lbs, which is not much. Don't over do it.

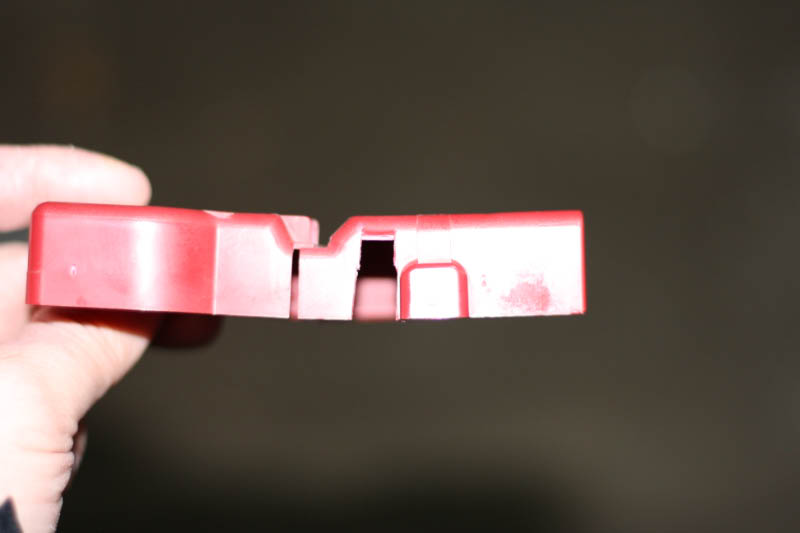
5. Cut a notch into the side of the terminal cover to accomodate the ring terminal. I used snips.

6. Reinstall the terminal cover and the negative battery terminal.
When you're finished it should look like this:

7. Secure the cable to the cowl vent with small black zip ties, leaving about 6 inches free. To fish the zip ties through the vent holes, put a couple of sharp bends in the ties to create a tight V shape. While holding the mouth of the tie, push the bottom of the V into a single vent hole until the tongue disappears, then pull back up. If you've done it right the tongue will reemerge from an adjacent hole.

8. Cut a notch in the battery compartment cover to accommodate the cable. (See the first pic.) I used the same snips from step 5.
9. Re-pair your phone and re-do all your radio presets...
The Battery Tender Plus comes with a standard jumper-style cable and a "quick-connect" cable. I wanted to find a way to use the quick-connect cable to make using the Battery Tender as convenient as possible. This is what I came up with.

The cable is secured to the cowl cover by a pair of zip ties, so there's no permanent modification of the car's exterior. You do have to mangle some of the plastic in the battery compartment however. More on that later. The cable has an inline fuse to protect the battery and also has a weather-resistant rubber plug. It tucks up easily under the back of the hood and is not visible.
1. Disconnect the negative battery terminal and fully remove the 10 mm clamp nut and square headed bolt. Put a towel or something over the negative battery terminal to prevent accidental contact.
2. You will have to remove some material from the sides of the cable's negative ring terminal so it will fit in the clamp's channel under the bolt head. I used an end cutter to nip off a bit from each side.
3. Reassemble the clamp with the ring terminal in place on the bolt side, but do not attach it to the battery yet.
4. Remove the red plastic positive terminal cover and remove the 12 mm nut from the left harness terminal. Install the positive ring terminal sideways and reinstall the nut. The torque is 10 ft-lbs, which is not much. Don't over do it.

5. Cut a notch into the side of the terminal cover to accomodate the ring terminal. I used snips.

6. Reinstall the terminal cover and the negative battery terminal.
When you're finished it should look like this:

7. Secure the cable to the cowl vent with small black zip ties, leaving about 6 inches free. To fish the zip ties through the vent holes, put a couple of sharp bends in the ties to create a tight V shape. While holding the mouth of the tie, push the bottom of the V into a single vent hole until the tongue disappears, then pull back up. If you've done it right the tongue will reemerge from an adjacent hole.

8. Cut a notch in the battery compartment cover to accommodate the cable. (See the first pic.) I used the same snips from step 5.
9. Re-pair your phone and re-do all your radio presets...
#3
Followed your DIY, while my 37 vert is an outside little used car, I had to place the connection further under the hood. What I found amazing was that when the battery was fully charged, the car felt way more lively/powerful! Thanks for your DIY!
Thread
Thread Starter
Forum
Replies
Last Post
dedmanchan
Audio, Video & Electronics
1
09-25-2015 12:25 AM
SuicidalG37SGuy
Engine, Drivetrain & Forced-Induction
8
09-10-2015 07:01 AM


