
DIY: Changing G37 Fog Lights to 6K HID Xenon
 08-17-2010, 02:12 PM
#1

DIY: Changing G37 Fog Lights to 6K HID Xenon
I recently changed the fog lights on my 2008 G37S for HID Xenon. This DIY identifies the kit I installed and the work effort to get them in. They are plug-and-play and no wires have to be cut, although it might be easier to cut a few and reconnect later.
<O </O
</O
Caution:<O</O
A word of caution for those with Daytime Running Lights (DRL) that use the fog lights: This installation will utilize the new HIDs as the DRL and they will be on full power at all times and not dim like the original DRLs unless you remove the DRL function. On the original DRLs the voltage is dropped to lower the output but the Xenon HID will not light at the lower voltage so the DRL function must be disabled. In my case, the fogs are no longer the DRL and the DRL function was re-routed to the City Lights. A simple solution might be to pull the DRL fuse in the fuse box near the battery.
<O</O
As you are handling delicate bulbs it is strongly recommended to use protective gloves to avoid getting fingerprints or grease on the bulbs.
<O</O
This is what I ordered for the install:
<O</O
HID Fog light kit<O</O
http://www.v-leds.com/Exterior-HID/H1/V-HIDS-PREMIUM-DIGITAL-p8092179.html
<O</O
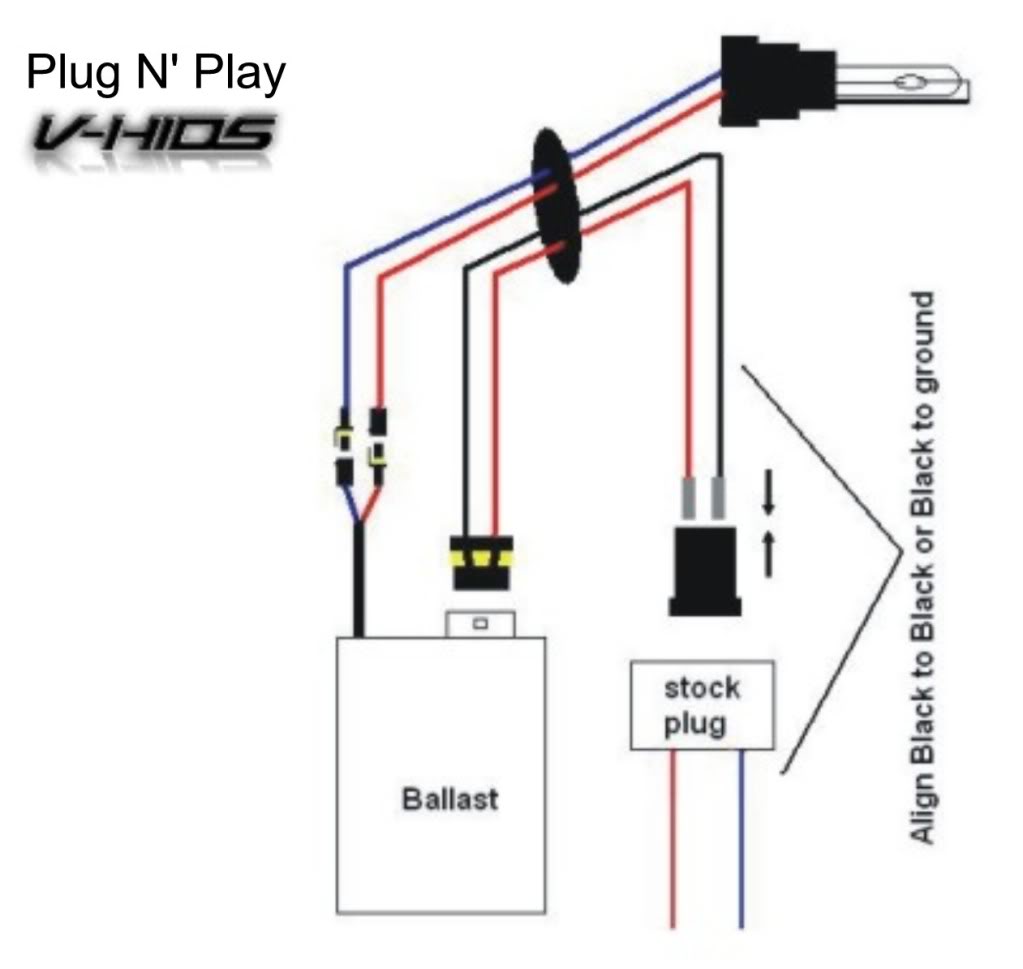
This is what is in the kit: 35 watt ballasts, 6K Xenon bulbs, rubber grommet, support brackets, and instructions.
<O</O

<O</O
And the wiring diagram:
<O</O
<O</O
<O</O
Level of Difficulty:<O</O
<O</O
I would rate this conversion to be 5 out of 10 as it does involve some minor cutting of OEM plastic and rewiring.
<O</O
First off, the headlights are somewhat difficult to work on due to their difficult-to-access connectors. I would estimate the installation of the Fog light HID kit to take 1 1/2 to 2 hours for all not including the wheel removal.
<O</O
I�ve heard of others removing the front bumper (which is easy) and then removing the headlight assembly to access all the lighting connections. Seems like it should work, but is not the way I did it.
<O</O
<O</O
Wheel Removal:<O</O
<O</O
Like most others, I placed the front-end on jack stands and removed both front wheels, then dropped the wheel liner. There are other DIYs that cover this portion of accessing the light assembly. Essentially, there are about 6 clips that can be popped off the wheel liner and then either folded down or removed completely. In my case, I removed one side and folded on the other but there is really no difference.
<O</O
Access to the Fog Light assembly:<O</O
<O</O

<O</O
By looking at the above photo, you can figure out how to identify each of the lights.
<O</O
Circled in red is the headlight HID, Blue is the fog light access cap, and Yellow is the parking/city light; the side marker is not shown but is above and to the left in the image:
<O</O
The fog light cover unscrews to the left and then pulls straight out. You will note there are two wires going through the cap and connect to the factory fog lights. These wires can be unplugged from the bulb but do not pull through the cap due to the size of the connector. To connect to the fog light kit, these connectors have to be outside the cap. To illustrate the point that this kit is plug_and_play, we used a drill bit to enlarge the hole somewhat then pulled them out. It is probably easier to cut the connector off then re-attach later. See below:
<O</O

<O</O
Once they were out, the hole in the cap was enlarged with a hole saw on my drill to permit 4 wires from the kit to go back in and connect to the Xenon bulbs. The kit comes with a new rubber grommet to seal the enlarged hole.

See below for result:
<O</O

<O</O
The new Xenons have a clear plastic protective cover for shipping that you can see in the photos above that must be carefully removed and then the Xenon is inserted into the slotted housing. I found it easier to look from the outside of the headlight to determine when the slot was oriented the correct way to slide the bulb in. It seemed like it was going to be too long for the holder but it did fit after several attempts. Then the screw cover can be reattached. If you look closely in the following picture, you can see the slotted opening for the Xenon to slide through:
<O</O

<O</O
The 35 watt ballast was attached to the support bracket and the support bracket attached to an existing screw on the rear of the headlight assembly (but any nearby screw or bolt will do).
<O</O
Disabling the DRL function: Easiest solution is to pull the fuse in the fuse box near the battery. <O</O
<O</O
As mentioned above the voltage drop to the DRLs when the headlights come on will cause a problem for the HID ballast. Consequently, we traced the line back to the fuse box and removed the DRL wire from the relay. The output from the relay was rerouted to the City Lights that are also 6K
<O</O
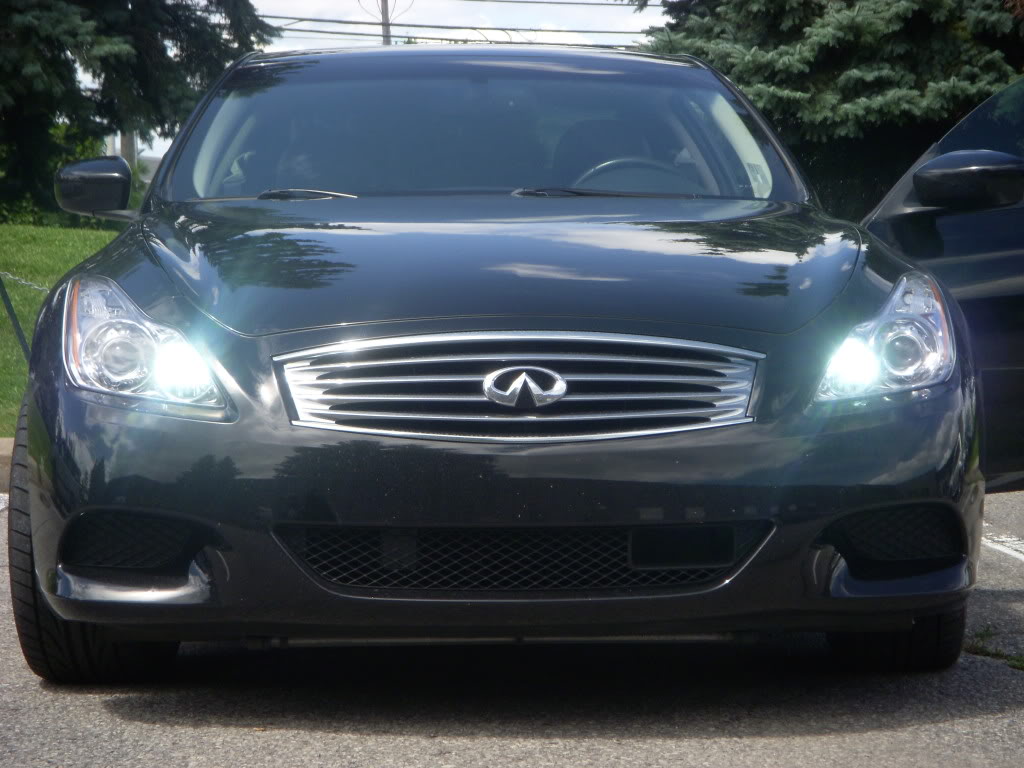
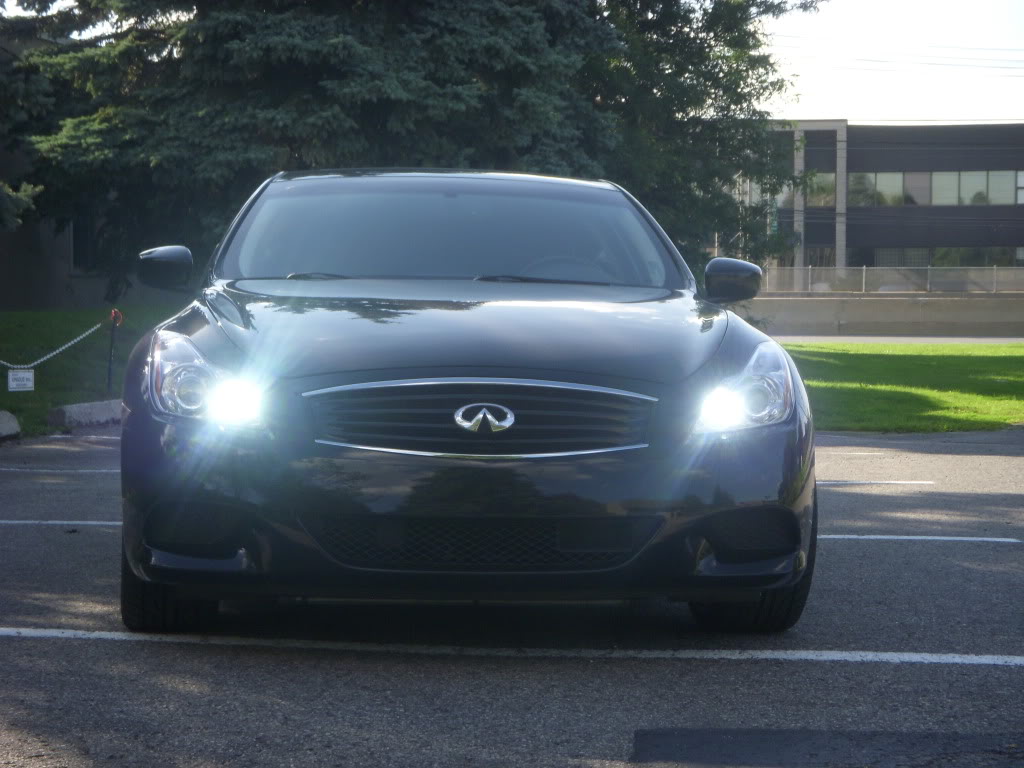
The results are shown in the photos below. Note the headlight projectors are 6K as well and the colour matches after they have both been on for some time.
<O</O
Day-time shot as the DRL (note I changed the grill between the 2 images):
<O</O
<O</O
<O</O
You�re done - enjoy your new Xenon HID Fogs!
<O</O
<O</O
<O
</OCaution:<O
</OA word of caution for those with Daytime Running Lights (DRL) that use the fog lights: This installation will utilize the new HIDs as the DRL and they will be on full power at all times and not dim like the original DRLs unless you remove the DRL function. On the original DRLs the voltage is dropped to lower the output but the Xenon HID will not light at the lower voltage so the DRL function must be disabled. In my case, the fogs are no longer the DRL and the DRL function was re-routed to the City Lights. A simple solution might be to pull the DRL fuse in the fuse box near the battery.
<O
</OAs you are handling delicate bulbs it is strongly recommended to use protective gloves to avoid getting fingerprints or grease on the bulbs.
<O
</OThis is what I ordered for the install:
<O
</OHID Fog light kit<O
</Ohttp://www.v-leds.com/Exterior-HID/H1/V-HIDS-PREMIUM-DIGITAL-p8092179.html
<O
</OThis is what is in the kit: 35 watt ballasts, 6K Xenon bulbs, rubber grommet, support brackets, and instructions.
<O
</O<O
</OAnd the wiring diagram:
<O
</O<O
</O<O
</OLevel of Difficulty:<O
</O<O
</OI would rate this conversion to be 5 out of 10 as it does involve some minor cutting of OEM plastic and rewiring.
<O
</OFirst off, the headlights are somewhat difficult to work on due to their difficult-to-access connectors. I would estimate the installation of the Fog light HID kit to take 1 1/2 to 2 hours for all not including the wheel removal.
<O
</OI�ve heard of others removing the front bumper (which is easy) and then removing the headlight assembly to access all the lighting connections. Seems like it should work, but is not the way I did it.
<O
</O<O
</OWheel Removal:<O
</O<O
</OLike most others, I placed the front-end on jack stands and removed both front wheels, then dropped the wheel liner. There are other DIYs that cover this portion of accessing the light assembly. Essentially, there are about 6 clips that can be popped off the wheel liner and then either folded down or removed completely. In my case, I removed one side and folded on the other but there is really no difference.
<O
</OAccess to the Fog Light assembly:<O
</O<O
</O<O
</OBy looking at the above photo, you can figure out how to identify each of the lights.
<O
</OCircled in red is the headlight HID, Blue is the fog light access cap, and Yellow is the parking/city light; the side marker is not shown but is above and to the left in the image:
<O
</OThe fog light cover unscrews to the left and then pulls straight out. You will note there are two wires going through the cap and connect to the factory fog lights. These wires can be unplugged from the bulb but do not pull through the cap due to the size of the connector. To connect to the fog light kit, these connectors have to be outside the cap. To illustrate the point that this kit is plug_and_play, we used a drill bit to enlarge the hole somewhat then pulled them out. It is probably easier to cut the connector off then re-attach later. See below:
<O
</O<O
</OOnce they were out, the hole in the cap was enlarged with a hole saw on my drill to permit 4 wires from the kit to go back in and connect to the Xenon bulbs. The kit comes with a new rubber grommet to seal the enlarged hole.
See below for result:
<O
</O<O
</OThe new Xenons have a clear plastic protective cover for shipping that you can see in the photos above that must be carefully removed and then the Xenon is inserted into the slotted housing. I found it easier to look from the outside of the headlight to determine when the slot was oriented the correct way to slide the bulb in. It seemed like it was going to be too long for the holder but it did fit after several attempts. Then the screw cover can be reattached. If you look closely in the following picture, you can see the slotted opening for the Xenon to slide through:
<O
</O<O
</OThe 35 watt ballast was attached to the support bracket and the support bracket attached to an existing screw on the rear of the headlight assembly (but any nearby screw or bolt will do).
<O
</ODisabling the DRL function: Easiest solution is to pull the fuse in the fuse box near the battery. <O
</O<O
</OAs mentioned above the voltage drop to the DRLs when the headlights come on will cause a problem for the HID ballast. Consequently, we traced the line back to the fuse box and removed the DRL wire from the relay. The output from the relay was rerouted to the City Lights that are also 6K
<O
</OThe results are shown in the photos below. Note the headlight projectors are 6K as well and the colour matches after they have both been on for some time.
<O
</ODay-time shot as the DRL (note I changed the grill between the 2 images):
<O
</O<O
</O<O
</OYou�re done - enjoy your new Xenon HID Fogs!
<O
</O<O
</O


 09-06-2010, 06:22 PM
#5

* So just got done with the 2010 G37x SEDAN INSTALL, went through the fender by turning the wheels in one side at a time and pulling back the shielding. This access worked well for the HID headlamp swap.
NOTE: The metal clip that holds the bulb in place is a little tricky and hard to see, so take you're time to feel around and bend it inward and up out of the way.
* For the HID conversion kit for the fog lamps you can go through the fender for the driver side but NOT for the passenger side. The washer fluid reservoir in the way on that side, so you have to go through the underside shielding, which makes seeing what you're doing a bit difficult.
Also NOTE: When you insert the HID bulb or H8 into the fog light housing, look at it from the front as you apply forward pressure and turn the bulb to lock it in place, Making sure that all three prongs are above the mounting tabs or the bulb will not seat properly. I also took the extra time to find a spot to zip-tie the ballasts so that they would not be loose and sliding around. This is easier to do on the driver side because of the better visibility and availability of random holes to use as anchors.
* And as always, Be sure to test each lamp before closing up the fender and under engine shielding. Total install time was about 1.5 hours including testing, mounting and figuring the first side out :P
Last edited by TONY37X; 09-08-2010 at 08:12 PM.


Trending Topics
11-09-2010, 12:24 AM
#9

I have the same kit (VLEDs) for my coupe fogs. I just couldn't get the metal clip to fit over the bulb and keep it in place. Ended up puncturing my finger and gave up.  Now I only have one fog light for now, and the other has a cover that's probably letting moisture into my headlight.
How did you get the metal clip to hold the bulb in place? It seems like the wrapping around the wires is too fat.
Now I only have one fog light for now, and the other has a cover that's probably letting moisture into my headlight.How did you get the metal clip to hold the bulb in place? It seems like the wrapping around the wires is too fat.

 01-02-2011, 04:45 PM
#14
Registered User

Join Date: Jul 2010
Posts: 203
Likes: 0
Received 0 Likes
on
0 Posts
I have the same kit (VLEDs) for my coupe fogs. I just couldn't get the metal clip to fit over the bulb and keep it in place. Ended up puncturing my finger and gave up. Now I only have one fog light for now, and the other has a cover that's probably letting moisture into my headlight.
How did you get the metal clip to hold the bulb in place? It seems like the wrapping around the wires is too fat.
Now I only have one fog light for now, and the other has a cover that's probably letting moisture into my headlight.How did you get the metal clip to hold the bulb in place? It seems like the wrapping around the wires is too fat.