
DIY: Retaining the Low Windshield Washer Fluid Sensor with Injen Intake Install
 11-24-2009, 09:00 PM
#1

DIY: Retaining the Low Windshield Washer Fluid Sensor with Injen Intake Install
A number of months ago I installed Injen cold air intakes on my G37 and followed installation instructions from others on this forum that gave fairly detailed instructions. As I bought the intakes used, they came with no instructions of any kind.
<O </O
</O
For those that aren�t aware, Injen provides a smaller red windshield washer bottle to allow the intakes to be positioned quite low behind the front bumper near the washer�s reservoir on the passenger side. I was surprised and somewhat dismayed that others said you would lose the low fluid level warning light that is standard on the G. In fact, they illustrated how to tie the sensor up and out of the way.<O</O
<O</O
I decided to take a chance and see if I could retrofit the sensor from the Infiniti bottle to the Injen bottle in the same manner as the pump.
These instructions illustrate that it is possible and that the sensor does continue to work with the Injen replacement reservoir. It took me a number of months to confirm it worked as after the install I went ahead and filled the reservoir to check for leaks then I had to wait until it got low to confirm it functioned as before. Ooops. <O</O
<O</O
<O</O
After removing the bumper, this is the factory reservoir bottle:
<O</O
<O</O
 <O</O
<O</O
<O</O
When it is removed from the vehicle, turning it over you can see the sensor (note the electrical plug came off first and is not shown):<O</O
<O</O
 <O</O
<O</O
<O</O
With a lot of effort, it can be removed from the Infiniti reservoir by pulling on it by hand and delicately with needle nose pliers; you will note I damaged it slighlty by prying and pulling on the clear lip:<O</O
<O</O
 <O</O
<O</O
<O</O
In fact, it tends to come apart and you can see the internal sensor (but it goes back together easily):<O</O
<O</O
 <O</O
<O</O
<O</O
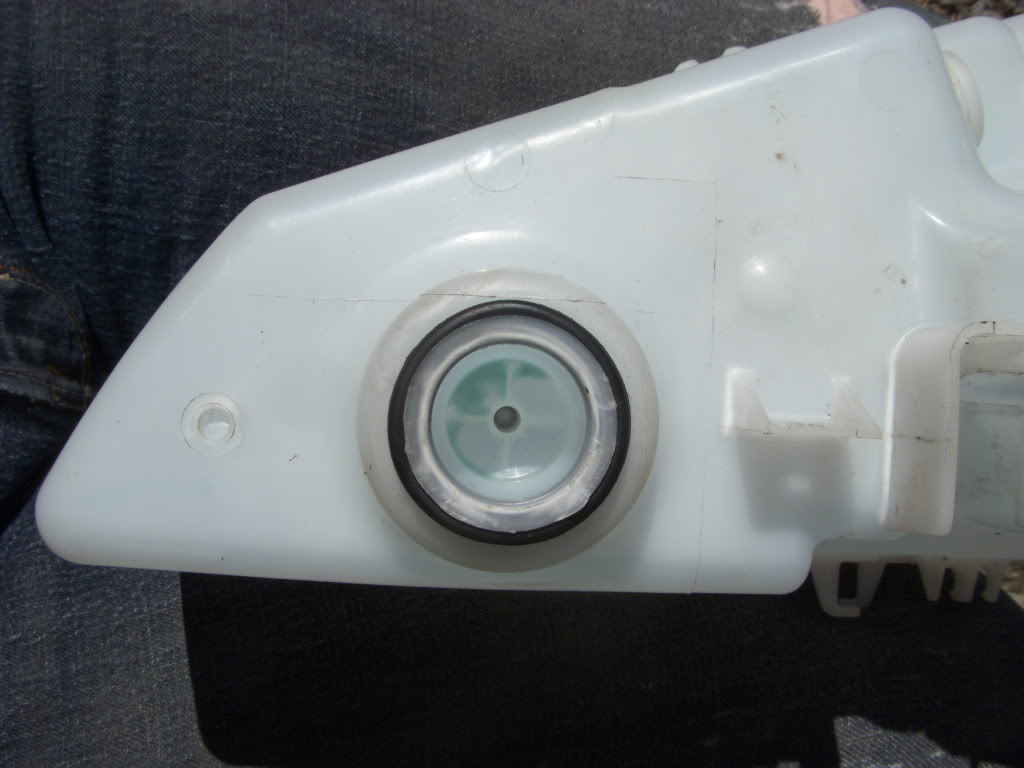
On the Injen red bottle, there is a location on the bottom that seems to be designed for the sensor. I took a drill bit and made an appropriate sized hole removing the plug that is there then filing it smooth:<O</O
<O</O
 <O</O
<O</O
<O</O
I might add that the Injen reservoir is significantly thicker than the Infiniti reservoir at the plug location. This meant that inserting the sensor and rubber grommet back into the hole was a bit of a challenge. The rubber grommet seals don�t quite match due to the increased thickness. (Injen you could easily make it exact!). However, it did get inserted and reconnecting the electrical contact plug resulted in the following:<O</O
<O</O
 <O</O
<O</O
<O</O
Hope this helps�.
<O</O
<O</O
<O
</OFor those that aren�t aware, Injen provides a smaller red windshield washer bottle to allow the intakes to be positioned quite low behind the front bumper near the washer�s reservoir on the passenger side. I was surprised and somewhat dismayed that others said you would lose the low fluid level warning light that is standard on the G. In fact, they illustrated how to tie the sensor up and out of the way.<O
</O<O
</OI decided to take a chance and see if I could retrofit the sensor from the Infiniti bottle to the Injen bottle in the same manner as the pump.
These instructions illustrate that it is possible and that the sensor does continue to work with the Injen replacement reservoir. It took me a number of months to confirm it worked as after the install I went ahead and filled the reservoir to check for leaks then I had to wait until it got low to confirm it functioned as before. Ooops.
<O</O<O
</OAfter removing the bumper, this is the factory reservoir bottle:
<O
</O<O
</O<O</O<O
</OWhen it is removed from the vehicle, turning it over you can see the sensor (note the electrical plug came off first and is not shown):<O
</O<O
</O<O</O<O
</OWith a lot of effort, it can be removed from the Infiniti reservoir by pulling on it by hand and delicately with needle nose pliers; you will note I damaged it slighlty by prying and pulling on the clear lip:<O
</O<O
</O<O</O<O
</OIn fact, it tends to come apart and you can see the internal sensor (but it goes back together easily):<O
</O<O
</O<O</O<O
</OOn the Injen red bottle, there is a location on the bottom that seems to be designed for the sensor. I took a drill bit and made an appropriate sized hole removing the plug that is there then filing it smooth:<O
</O<O
</O<O</O<O
</OI might add that the Injen reservoir is significantly thicker than the Infiniti reservoir at the plug location. This meant that inserting the sensor and rubber grommet back into the hole was a bit of a challenge. The rubber grommet seals don�t quite match due to the increased thickness. (Injen you could easily make it exact!). However, it did get inserted and reconnecting the electrical contact plug resulted in the following:<O
</O<O
</O<O</O<O
</OHope this helps�.
<O
</O<O
</O


 11-26-2009, 12:09 AM
#4
Seems rather obvious but truth is I wanted it to be tight so I used a smaller bit to make a smaller hole first but couldn't get the grommet into the hole no matter how hard I pushed (even thought about using the old rubber mallet).
I then went and made the hole bigger until I could force it in. As you can make the hole bigger by sanding or drilling, I would recommend erring on the small side to start.
As the Injen plug is so close to the desired size, it seems like it was meant for this process, only the plastic is very thick at this location.
As I still have the Infiniti bottle without the sensor, I'll go and measure the hole and post it up tomorrow by editing this post. I have a full collection of spade bits but I realize not everyone does.
Update: After measuring the hole I now remember the rest of the process. It seems that the hole is 1 3/16 inches in diameter and I have a 1 1/8th (too small) and 1 1/4 (too big). See photo below. I went smaller and filed/sanded it to make it a bit larger.

Last edited by Mid-Life Crisis; 11-26-2009 at 09:38 AM.


Thread
Thread Starter
Forum
Replies
Last Post
superjoey
D.I.Y. Installations/Modifications
31
03-22-2023 11:56 PM