
DIY: G37 Betty's Garage grounding wires installation
 03-04-2009, 03:09 PM
#1

G37 Betty's Garage grounding wires installation
Here's how to install the wire set.
DISCLAIMER: This set of wires is purchased and used solely at your own risk. I will not be held responsible or liable for any harm or damage that comes to your car or to you. What you are installing is a set of wires, nothing more. Take every reasonable precaution for safety when installing. Use good judgment and common sense. Installation of the Betty's Garage Grounding Wires do not necessarily void your factory warranty on electrical components in your car unless it can be proven that they are the cause of the malfunction. With proper installation they will not be.
Tools needed:
All bolts shown are 10 mm.
1. DISCONNECT THE NEGATIVE BATTERY CABLE! You should always disconnect the negative battery cable before doing anything electrical on your car. Always!
2. Take either end of the longest single wire and connect it to your negative battery terminal. Leave this negative terminal disconnected until you finish all the steps before coming back to where you started and reconnecting the cable.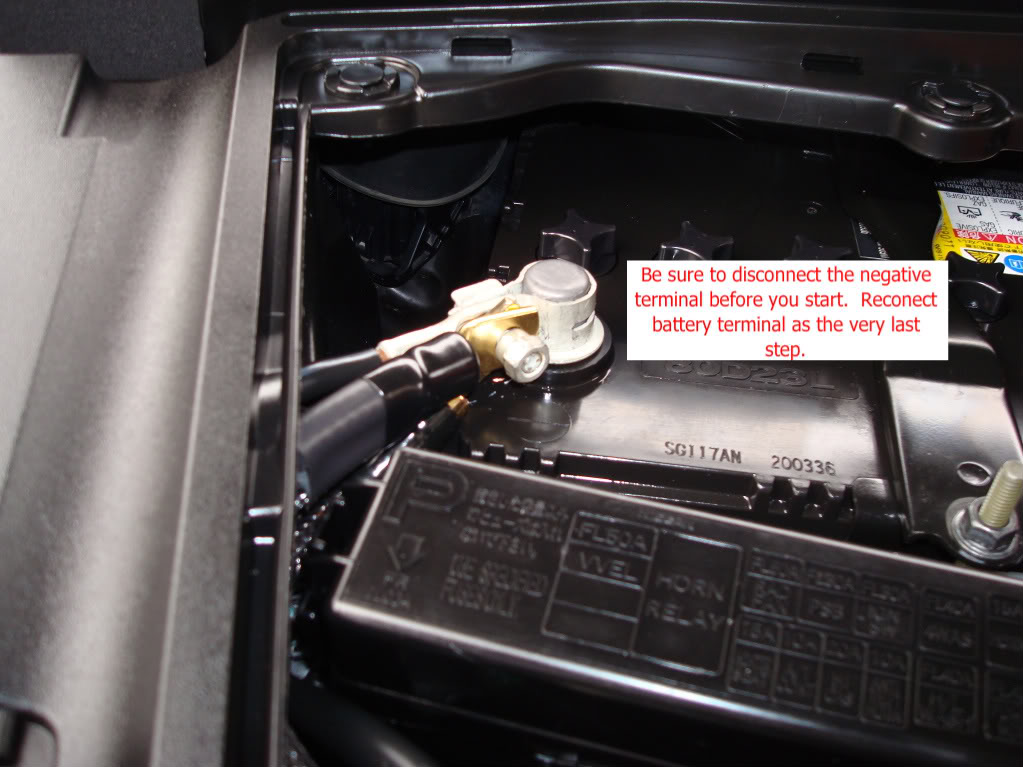
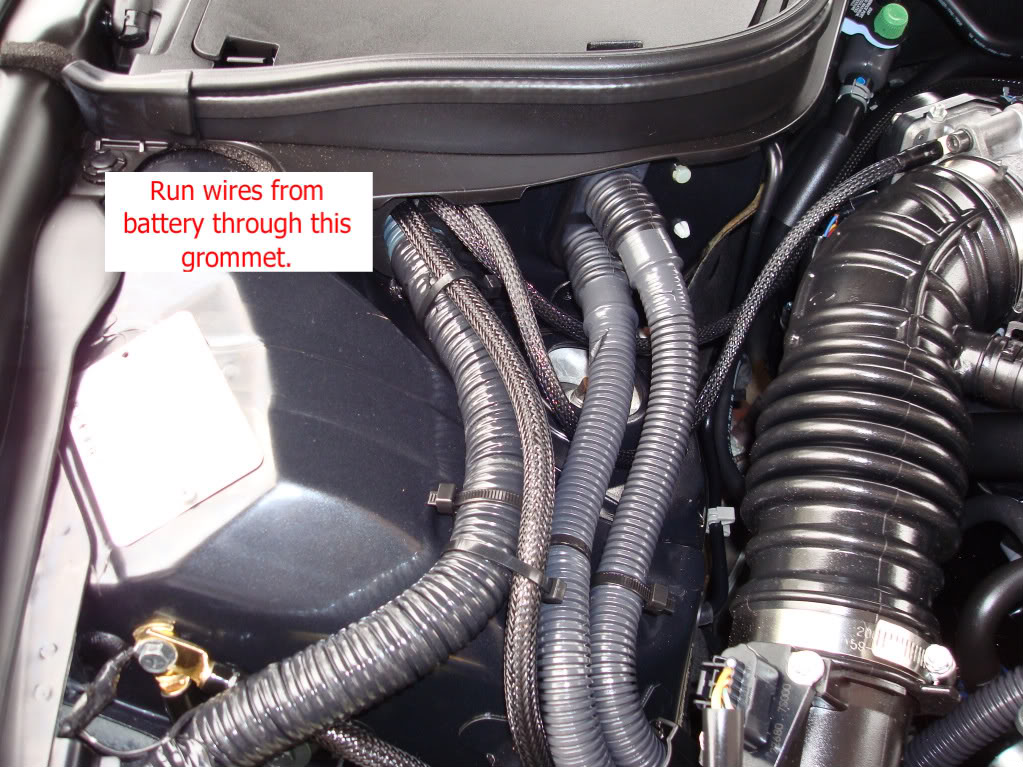
3. Run the wire through the opening that has the single bundle of wires running through it. There is enough room for you to run the grounding wire along side the wire bundle that's already there.
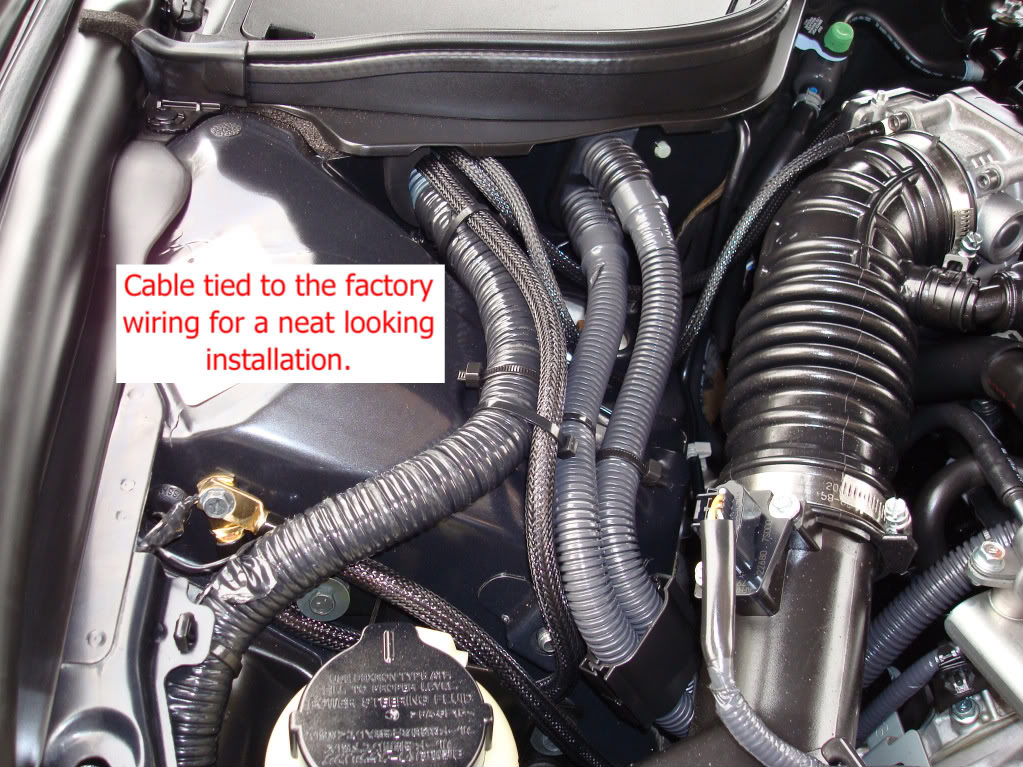
4. Connect the other end of the long wire to the bolt on the strut tower where there is already a tiny grounding wire anchored. Run the new wire underneath the existing one. Don't tighten the bolt all the way as you will attach another wire here. You can use the cable ties to attach the wire to the bundle of wires that it runs along for a factory looking install.
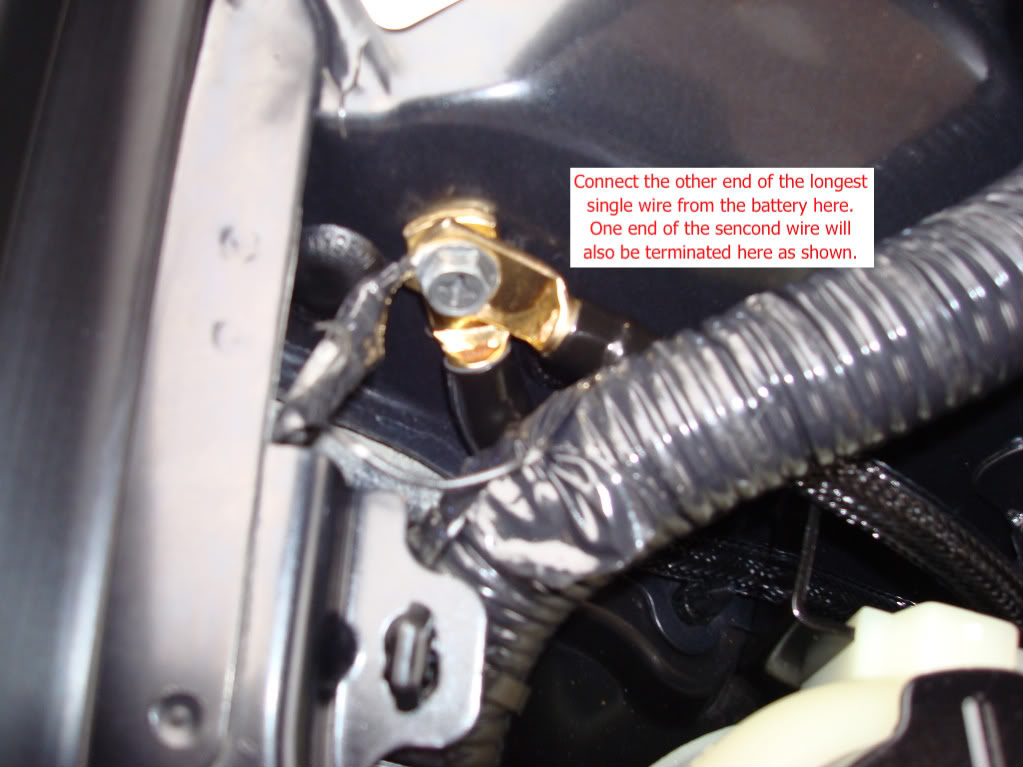
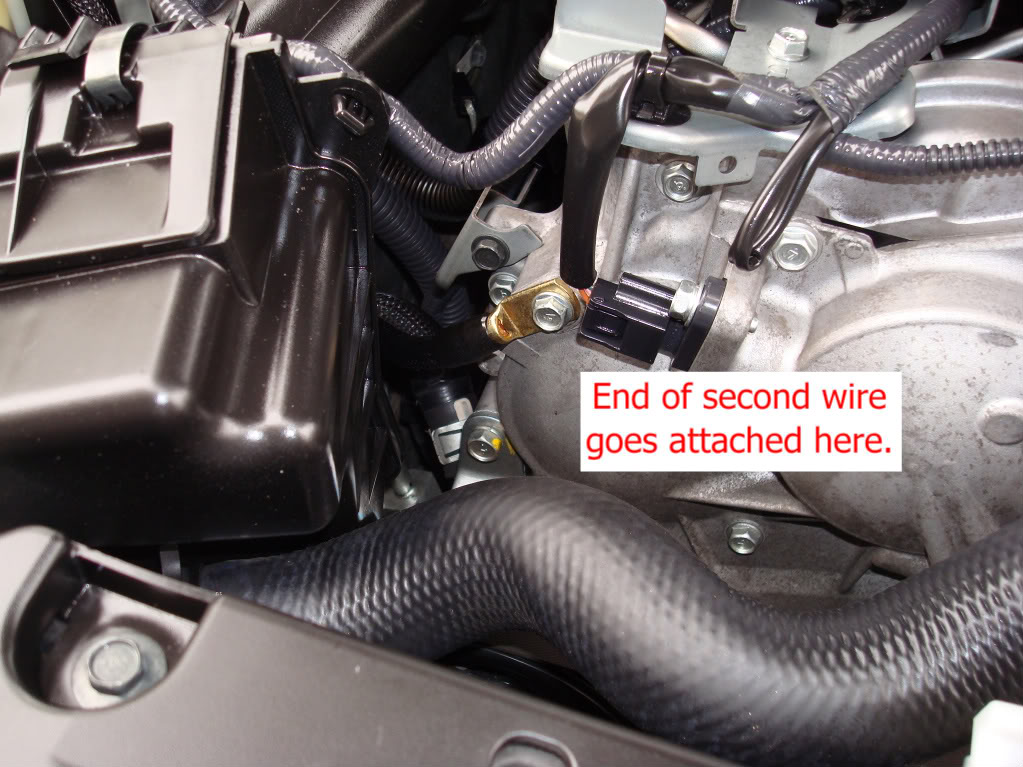
5. Connect either end of the second longest single wire to the same point you just terminated the first wire. Place both ring terminals on top on one another under the existing puny wire. Tighten bolt.
6. Run the wire under your intake tubing and connect to the bolt on the front side of the timing cover as shown on the passenger side. Tighten bolt.
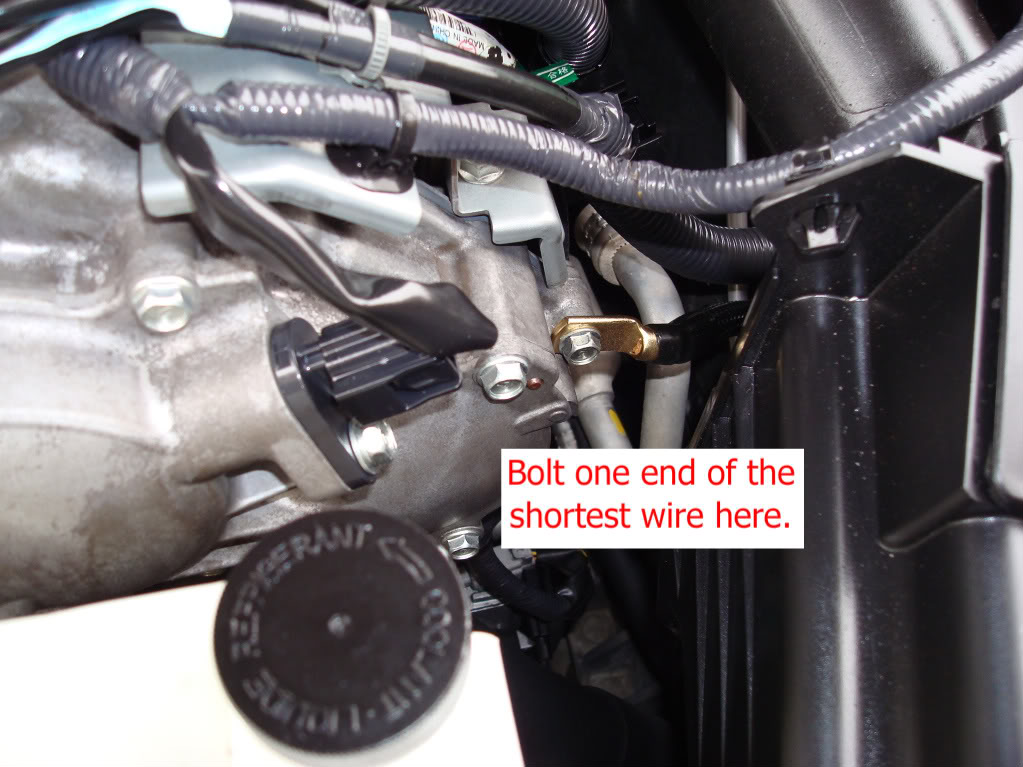
7. Connect either end of the shortest single wire to the bolt shown on the driver side. You may need to use a short extension or a deep 10 mm socket to reach this bolt easily.
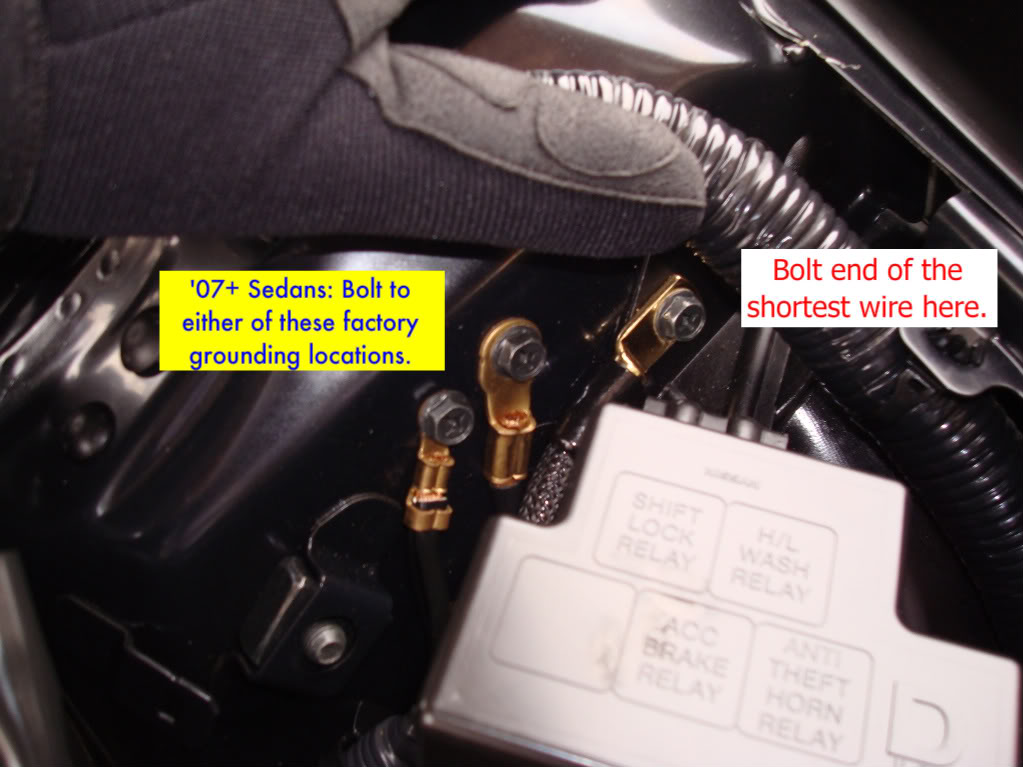
8. Connect the other end of the this wire to the bolt shown that holds the bracket for the relay box. '07+ SEDAN OWNERS NOTE: You don't have the bolt shown in this step, just a plastic cover there. Connect it to either of the factory grounding points show right beside where this wire is connected.
9. Remove your engine cover.
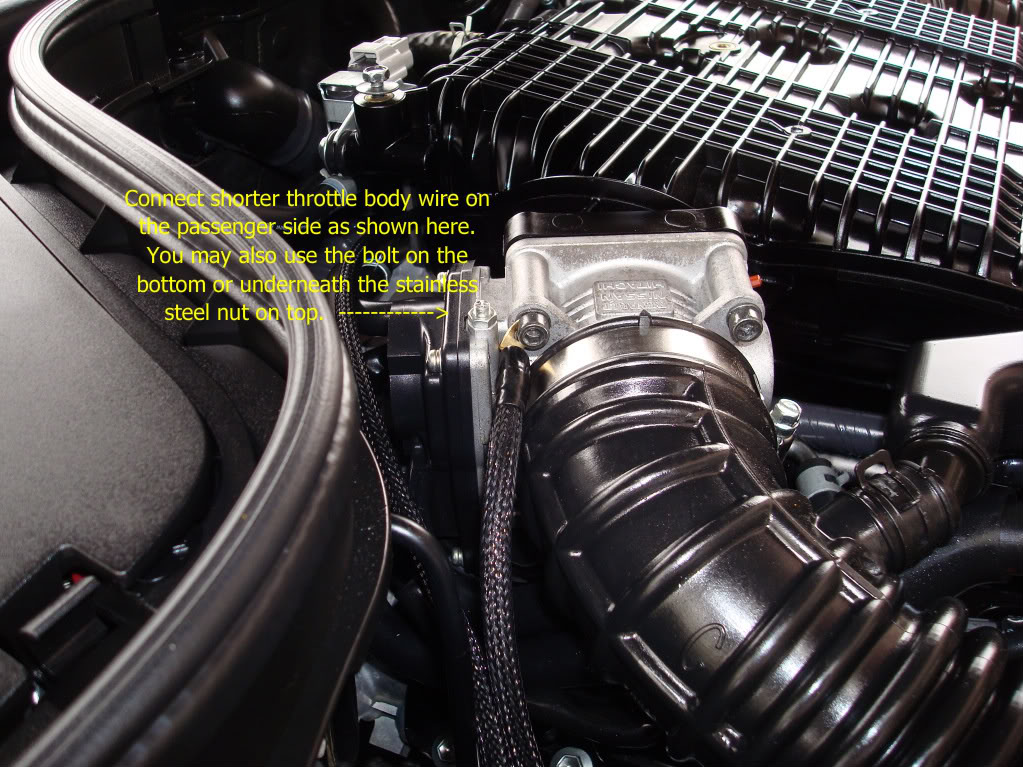
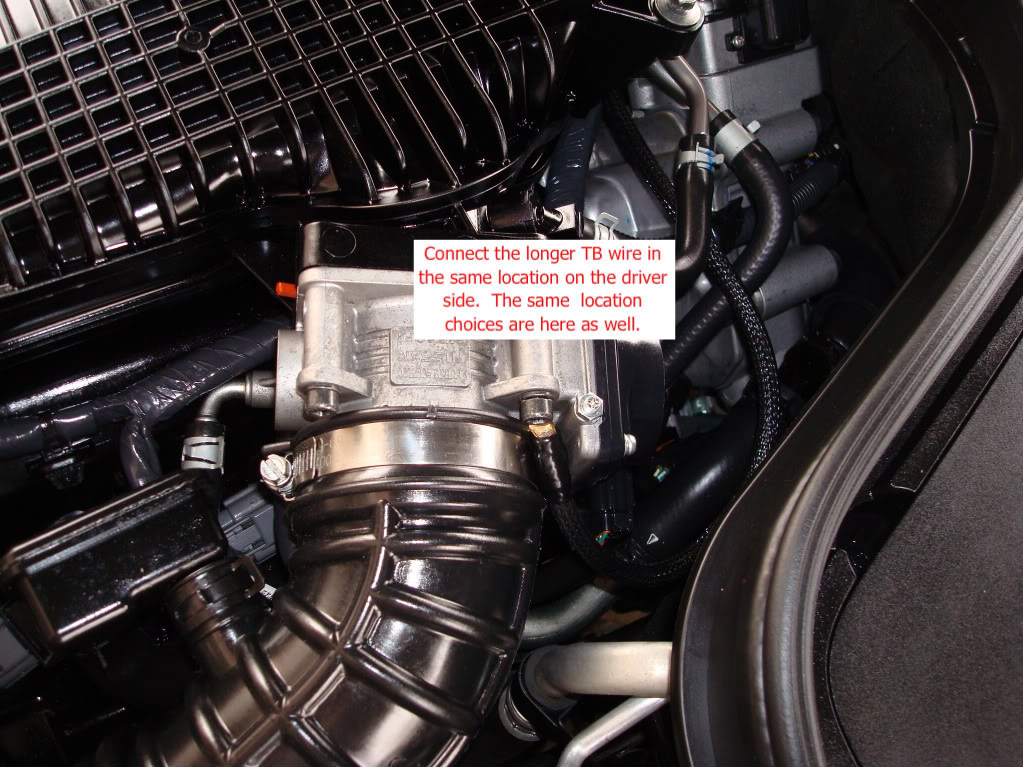
10. Connect the shorter of the two 8 AWG TB cables to the passenger side throttle body. You can do this in one of 3 places: 1) on the lower inset hex screw on the firewall side of the TB, 2) on the upper inset hex screw on the top firewall side of the TB, 3) underneath the stainless steel nut on top of the TB. The first 2 locations are a very tight fit and it may be easier to get the ring terminal connected by disconnecting the intake tubing. Under the nut on top of the TB is the easiest of the 3 locations, but it's your choice as any of the three will work just fine.
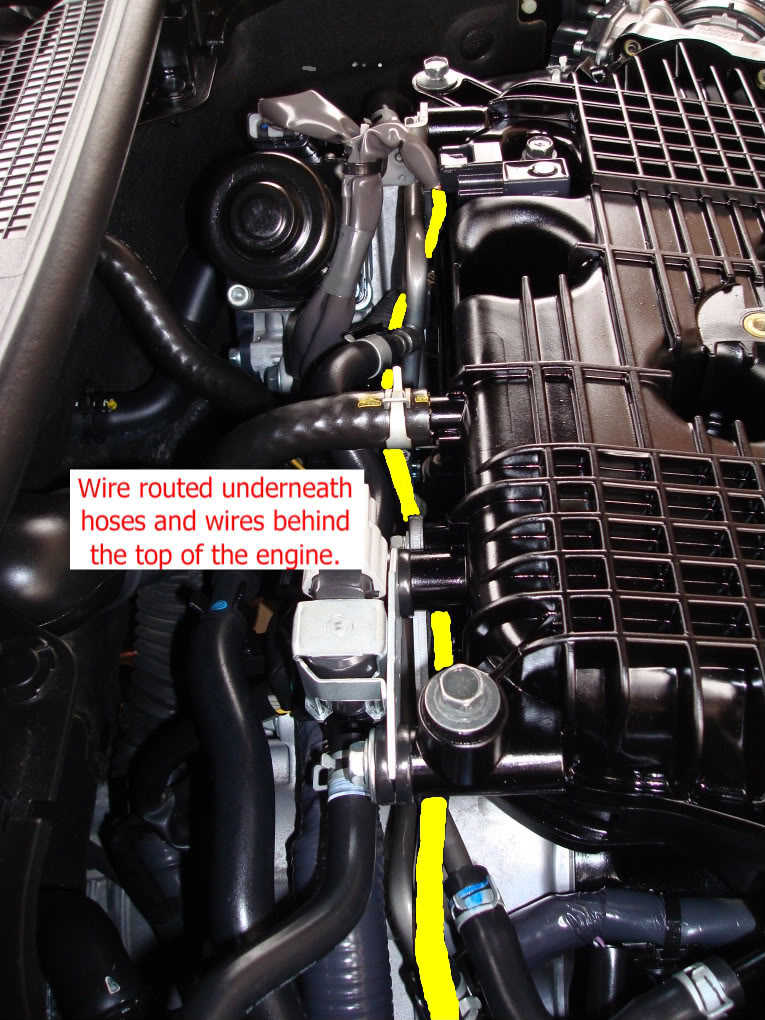
11. Connect the longer of the two 8 AWG TB cables to the driver side throttle body in your choice of the same 3 same locations as the other side. The cable length is designed to run underneath the various lines/hoses behind the top of the engine. This will make it very inconspicuous with the cover replaced and have it out of the way of everything.

12. Finally, run the end with the 4 AWG lug terminal where both wires are spliced together back through the same grommet as the battery to chassis cable (the first one). Attach it along with the other cable and reconnect your battery terminal.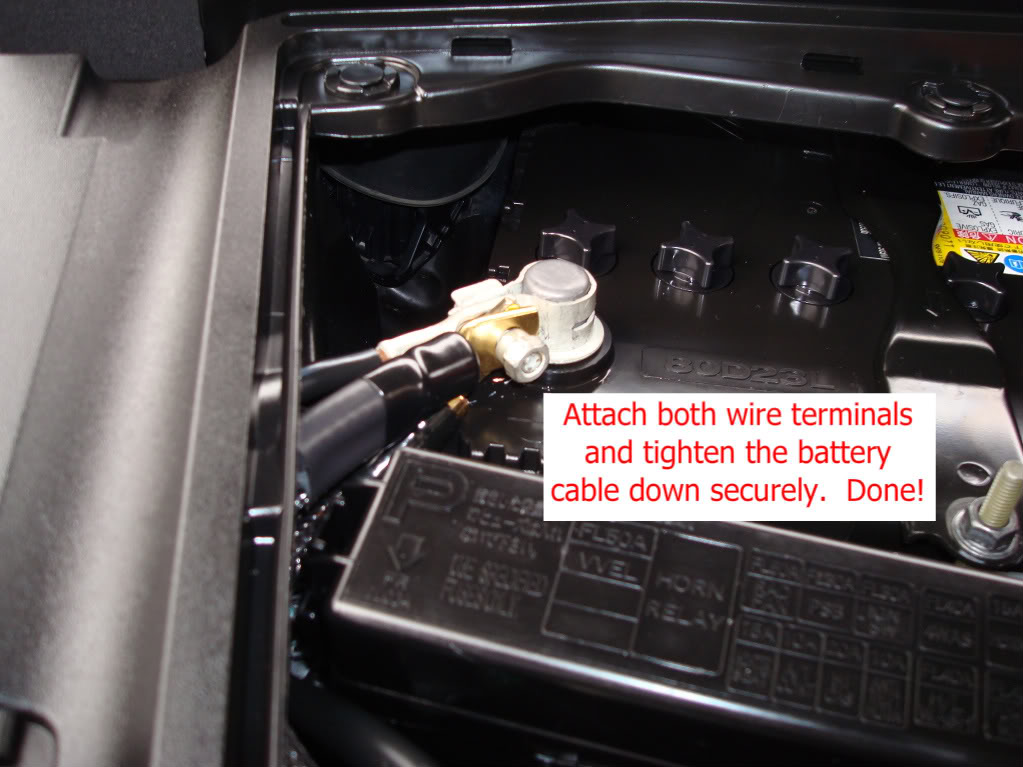
13. Voila! You are done. Enjoy.
You will need to reset your windows since your battery has been disconnected. To perform a window reset:
1. Push the ignition switch to the ON position.
2. Close the door.
3. Open the window more than halfway by operating the power window switch.
4. Pull the power window switch and hold it to close the window, and then hold the switch more than 3 seconds after the window is
closed completely.
5. Release the power window switch. Operate the window by the automatic function to confirm the initialization is complete.
6. Perform steps 2 through 5 above for other windows.
DISCLAIMER: This set of wires is purchased and used solely at your own risk. I will not be held responsible or liable for any harm or damage that comes to your car or to you. What you are installing is a set of wires, nothing more. Take every reasonable precaution for safety when installing. Use good judgment and common sense. Installation of the Betty's Garage Grounding Wires do not necessarily void your factory warranty on electrical components in your car unless it can be proven that they are the cause of the malfunction. With proper installation they will not be.
Tools needed:
- 10 mm socket
- 8 mm socket
- ratchet
- short extension or a deep 10 mm socket
- 5 mm Allen wrench
All bolts shown are 10 mm.
1. DISCONNECT THE NEGATIVE BATTERY CABLE! You should always disconnect the negative battery cable before doing anything electrical on your car. Always!
2. Take either end of the longest single wire and connect it to your negative battery terminal. Leave this negative terminal disconnected until you finish all the steps before coming back to where you started and reconnecting the cable.
3. Run the wire through the opening that has the single bundle of wires running through it. There is enough room for you to run the grounding wire along side the wire bundle that's already there.
4. Connect the other end of the long wire to the bolt on the strut tower where there is already a tiny grounding wire anchored. Run the new wire underneath the existing one. Don't tighten the bolt all the way as you will attach another wire here. You can use the cable ties to attach the wire to the bundle of wires that it runs along for a factory looking install.
5. Connect either end of the second longest single wire to the same point you just terminated the first wire. Place both ring terminals on top on one another under the existing puny wire. Tighten bolt.
6. Run the wire under your intake tubing and connect to the bolt on the front side of the timing cover as shown on the passenger side. Tighten bolt.
7. Connect either end of the shortest single wire to the bolt shown on the driver side. You may need to use a short extension or a deep 10 mm socket to reach this bolt easily.
8. Connect the other end of the this wire to the bolt shown that holds the bracket for the relay box. '07+ SEDAN OWNERS NOTE: You don't have the bolt shown in this step, just a plastic cover there. Connect it to either of the factory grounding points show right beside where this wire is connected.
9. Remove your engine cover.
10. Connect the shorter of the two 8 AWG TB cables to the passenger side throttle body. You can do this in one of 3 places: 1) on the lower inset hex screw on the firewall side of the TB, 2) on the upper inset hex screw on the top firewall side of the TB, 3) underneath the stainless steel nut on top of the TB. The first 2 locations are a very tight fit and it may be easier to get the ring terminal connected by disconnecting the intake tubing. Under the nut on top of the TB is the easiest of the 3 locations, but it's your choice as any of the three will work just fine.
11. Connect the longer of the two 8 AWG TB cables to the driver side throttle body in your choice of the same 3 same locations as the other side. The cable length is designed to run underneath the various lines/hoses behind the top of the engine. This will make it very inconspicuous with the cover replaced and have it out of the way of everything.
12. Finally, run the end with the 4 AWG lug terminal where both wires are spliced together back through the same grommet as the battery to chassis cable (the first one). Attach it along with the other cable and reconnect your battery terminal.
13. Voila! You are done. Enjoy.
You will need to reset your windows since your battery has been disconnected. To perform a window reset:
1. Push the ignition switch to the ON position.
2. Close the door.
3. Open the window more than halfway by operating the power window switch.
4. Pull the power window switch and hold it to close the window, and then hold the switch more than 3 seconds after the window is
closed completely.
5. Release the power window switch. Operate the window by the automatic function to confirm the initialization is complete.
6. Perform steps 2 through 5 above for other windows.
Last edited by Black Betty; 01-13-2011 at 03:53 PM.

The following users liked this post:
YellowJacket (01-04-2015)
03-04-2009, 03:11 PM
#2
Posting this in the DIY section because I'm continually asked install questions. I figured I'd post them up here as they continually get buried on the vendor section and this seems like an appropriate place for them.
If you have any specific questions, pleas feel free to post here or send me an email or PM. Thanks all.
If you have any specific questions, pleas feel free to post here or send me an email or PM. Thanks all.
07-27-2009, 11:28 PM
#3
Registered User

Join Date: Jul 2009
Location: Keyport/Old Bridge, NJ
Posts: 400
Likes: 0
Received 4 Likes
on
4 Posts
Gotta a couple of questions!
1. What do you mean "throttle body upgrade"?
2. I haven't worked on this engine yet, but judging from the pics, the manifold is plastic. How does the car benefit from the wires connecting to the throttle body when the throttle body bolts to a plastic manifold? Is there a brace on the throttle body that grounds it somewhere else?
BTW, even though I still don't get the point of these kits, I love how yours is black instead of all the other flamboyant colors! Nice and clean!
07-28-2009, 12:16 AM
#4
2. I haven't worked on this engine yet, but judging from the pics, the manifold is plastic. How does the car benefit from the wires connecting to the throttle body when the throttle body bolts to a plastic manifold? Is there a brace on the throttle body that grounds it somewhere else?

For those who have already figured out all the reasons why these don't/won't/can't work, I think they should save their money and spend it on something else. It's not a problem for me. I don't want anyone to be disappointed. So long as those who do purchase from me have the right expectations and are satisfied with the craftsmanship and function of what they get from me, I'll be happy.
 01-10-2010, 01:57 PM
#5
Registered User

Join Date: Jan 2008
Location: H-Town
Posts: 288
Likes: 0
Received 0 Likes
on
0 Posts
anyone have voltage problems after installing any grounding kits...not referring to bettys kit..just ever since i put them on..my cars died out twice...need info...thanks
04-28-2010, 11:20 PM
#6
Registered User

Join Date: Feb 2010
Location: Montreal
Posts: 43
Likes: 0
Received 0 Likes
on
0 Posts
I ordered and received this kit about a month ago but I waited to install my shifter paddles first. I drove the car for a while to get used to the paddles and installed the grounding wires this past weekend. Let me tell you they definitely make a noticeable difference. The shifts are quicker. Glad I did the wires. Thanks Jeremy
05-15-2011, 09:02 PM
#7
Registered User

Just ordered a set. I've always been disappointed with the lag on shifting. Plus I have some other electrical woes that may help by ensuring good grounds.
I'll report back once installed. Thank you for the clear photos and quality product.
Coop
I'll report back once installed. Thank you for the clear photos and quality product.
Coop
Trending Topics

 05-29-2011, 04:57 PM
#11
I moved your earlier post to a more appropriate thread and answered the questions here:
https://www.myg37.com/forums/misc-ve...ing-wires.html
https://www.myg37.com/forums/misc-ve...ing-wires.html
05-30-2011, 08:46 AM
#13
Registered User
iTrader: (4)

Join Date: Jul 2005
Location: Mandeville, LA
Posts: 390
Likes: 0
Received 0 Likes
on
0 Posts
BB, gonna wait another 80 miles till I have my car broken in and then I will do the install. Seems like an easy process. Also gonna try and reset the ECU. After that is all done, I can then drive it like I stole it.
