
DIY: 1st Generation G35 Betty's Garage grounding wire set installation
 03-04-2009, 02:57 PM
#1

1st Generation G35 Betty's Garage grounding wire set installation
Here's how to install the wire set.
DISCLAIMER: This set of wires is purchased and used solely at your own risk. I will not be held responsible or liable for any harm or damage that comes to your car or to you. What you are installing is a set of wires, nothing more. Take every reasonable precaution for safety when installing. Use good judgment and common sense. Installation of the Betty's Garage Grounding Wires do not necessarily void your factory warranty on electrical components in your car unless it can be proven that they are the cause of the malfunction. With proper installation, they will not be.
Tools needed:
All bolts shown are 10 mm except on top of throttle body which is 8 mm.
1. DISCONNECT THE NEGATIVE BATTERY CABLE! You should always disconnect the negative battery cable before doing anything electrical on your car. Always!
2 Remove the engine cover.
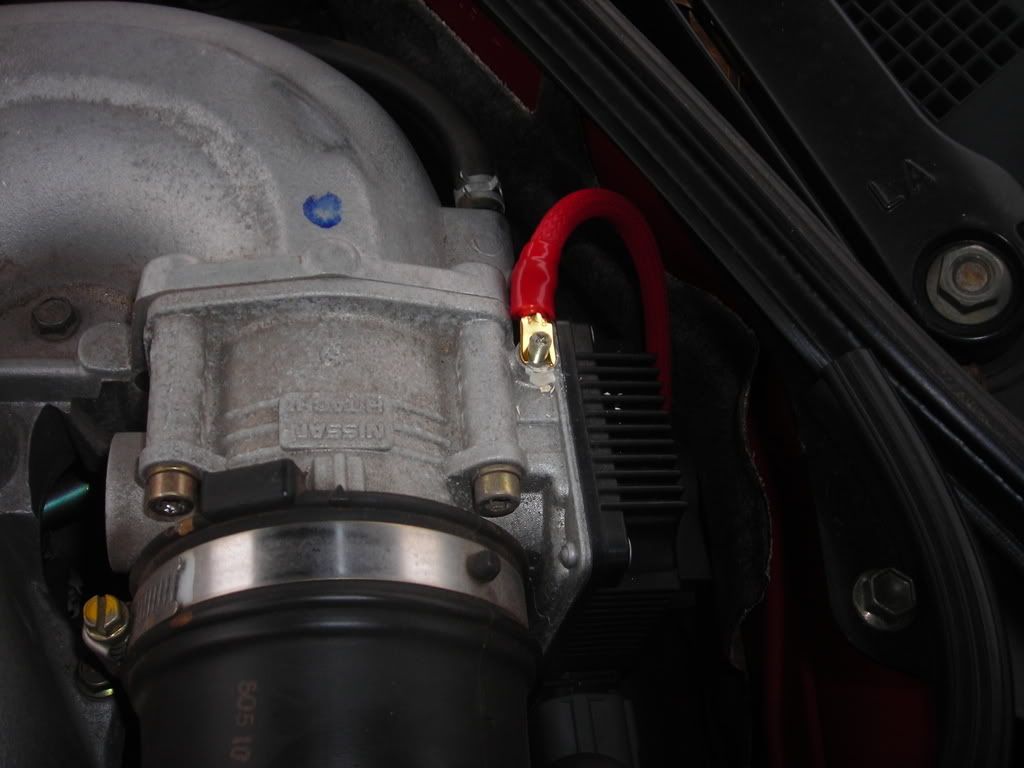
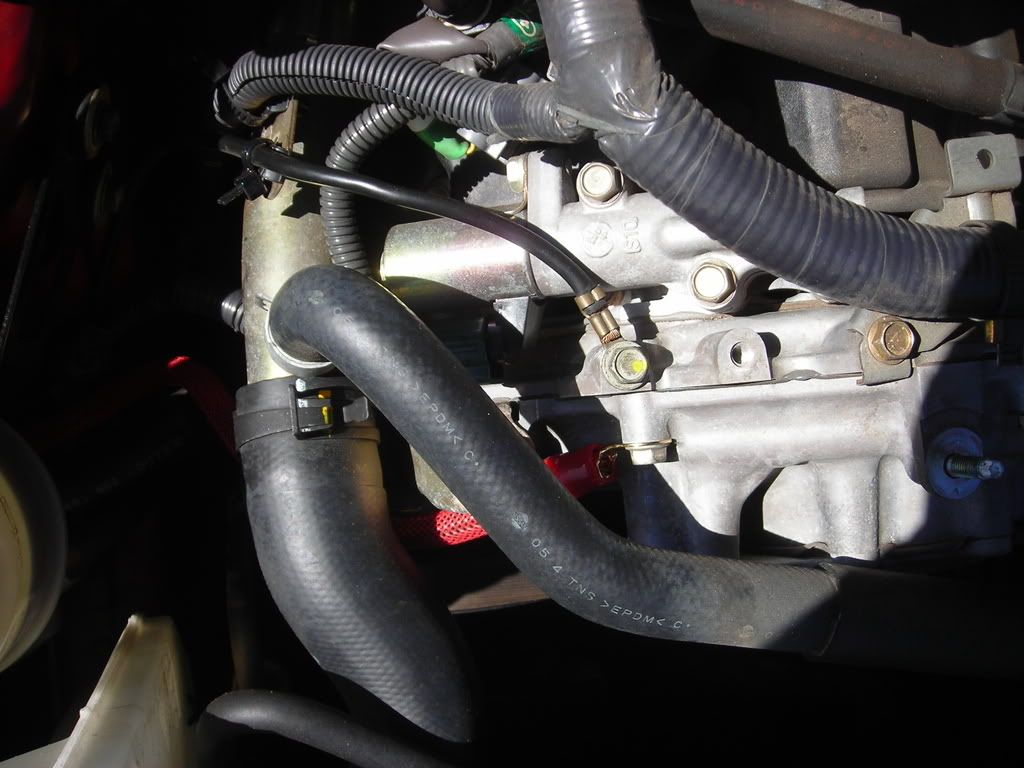
3. The longest 8 AWG wire is to ground the throttle body directly to the battery. Connect the end with the spade terminal to the throttle body by loosening the small 8 mm stainless steel nut on top of the throttle body and placing the spade terminal underneath. Tighten the nut back down.
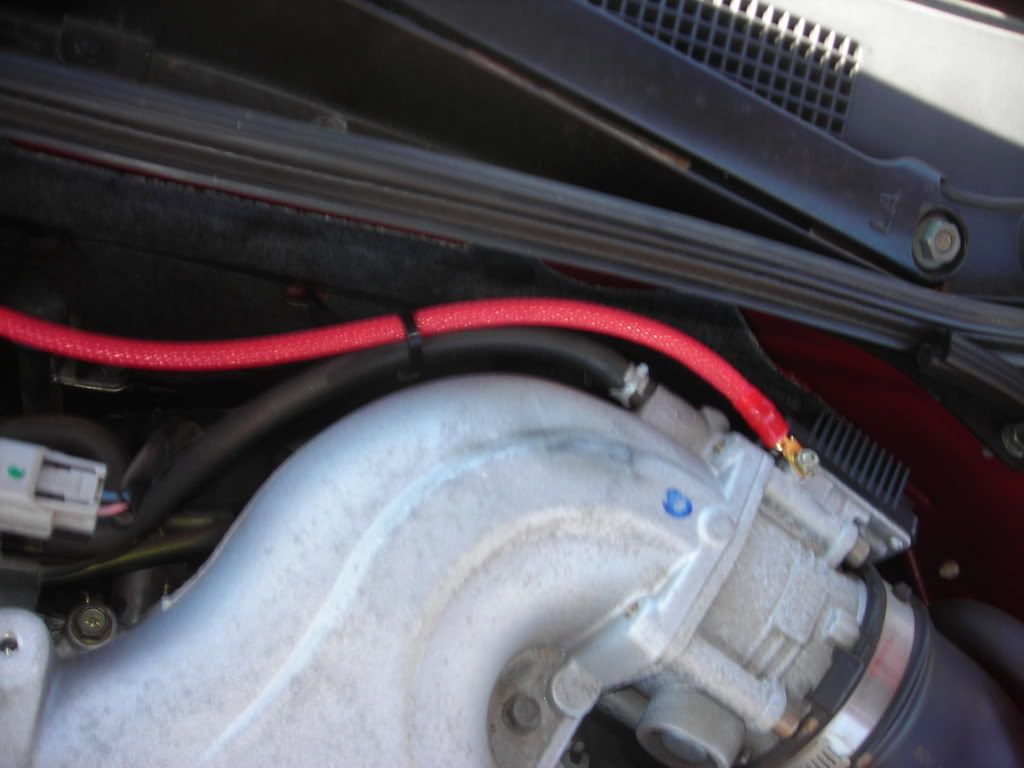
4. Run the cable behind the engine and through the wire grommet into the battery compartment. Don't connect to the negative battery terminal yet.
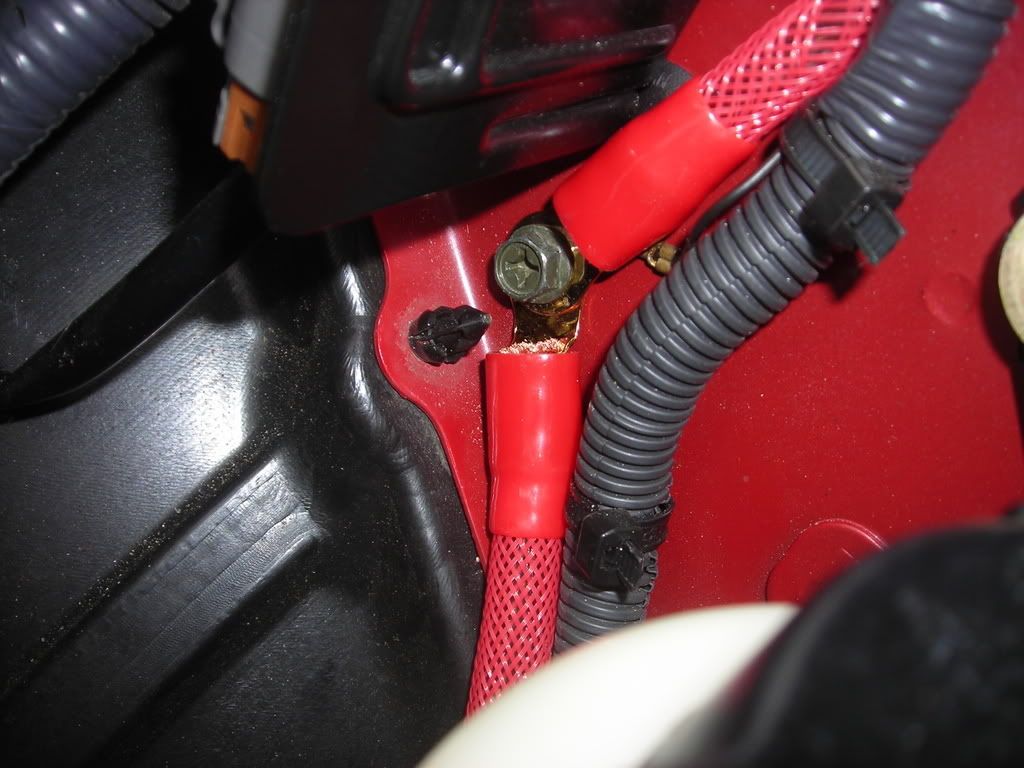
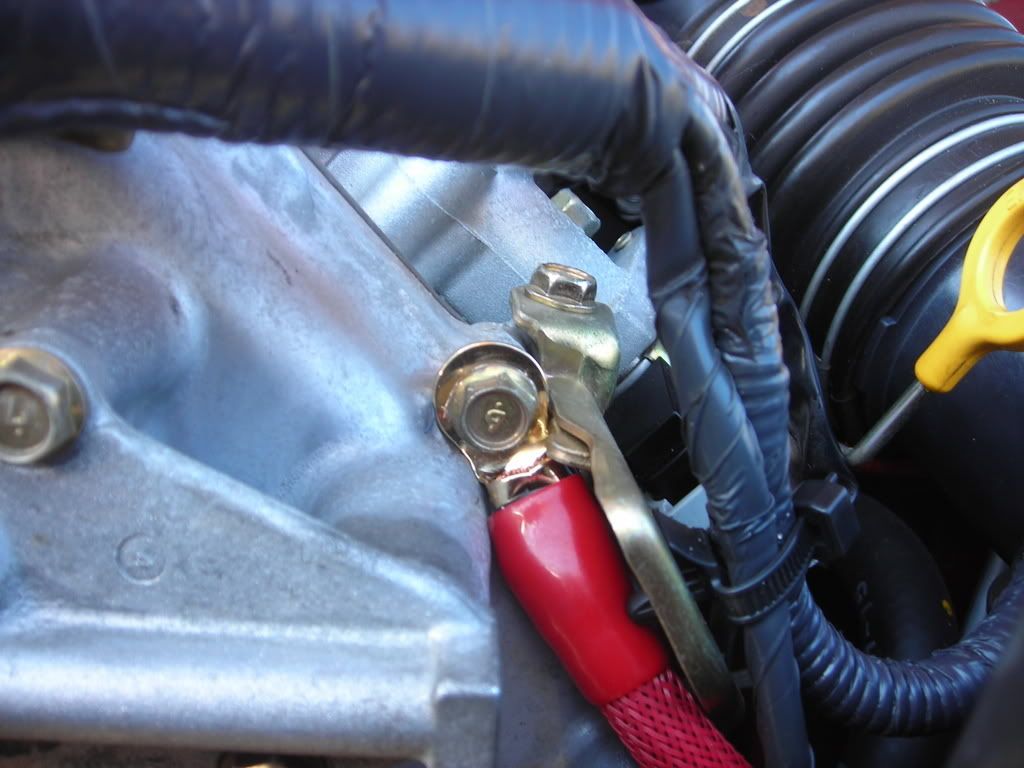
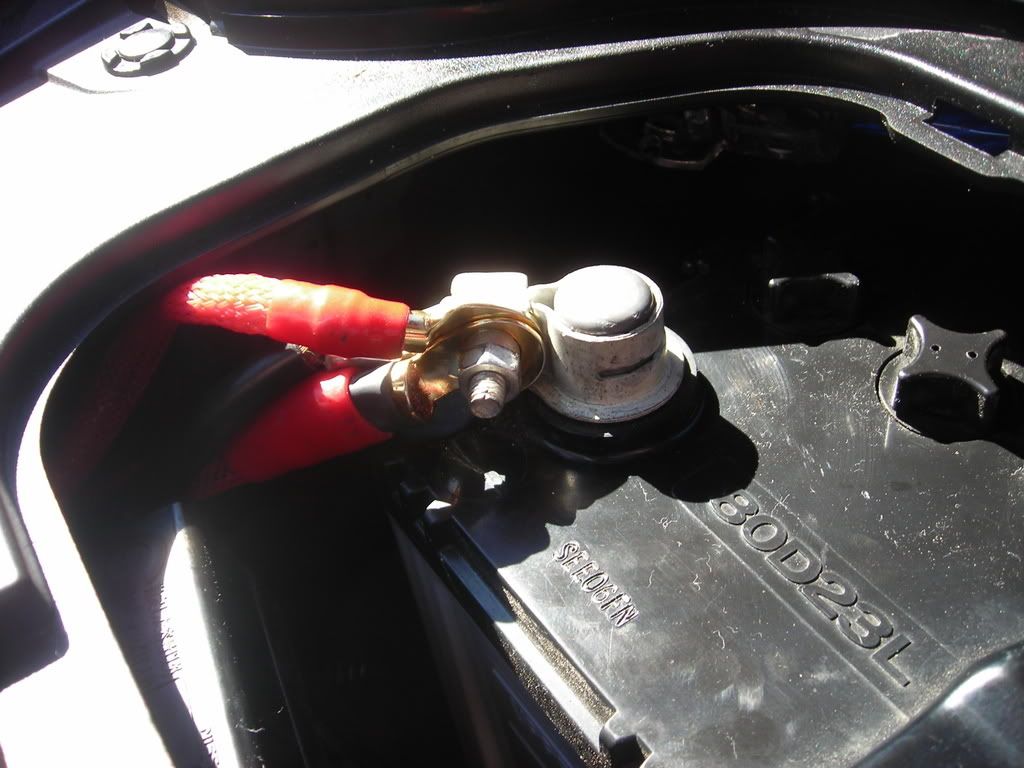
5. Run the second longest cable from the negative battery terminal through the battery compartment wiring grommet to the point shown in the second photo below to ground the battery to the chassis.
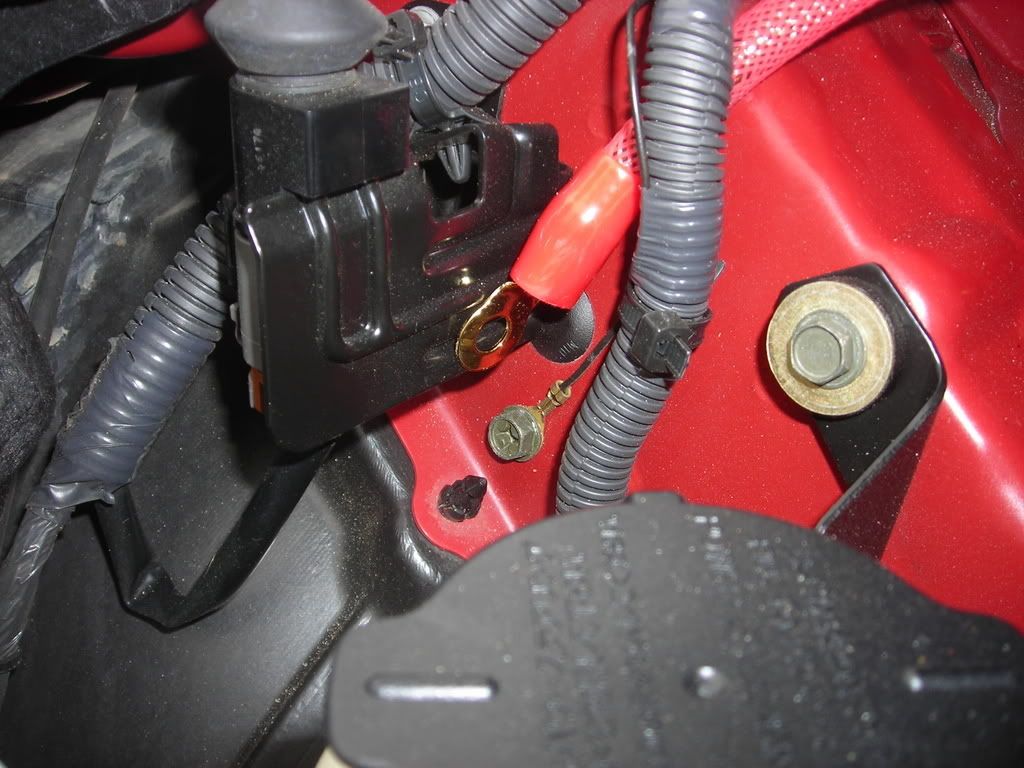
See that tiny black wire grounded here? That is what is grounding your headlights! Pathetic. Remove the bolt and place the end of the grounding wire on top of the black wire that's already there. As you can see from the next photo, one end of another wire will go here as well. Go ahead and bolt the second longest and one end of either one of the shorter wires here.
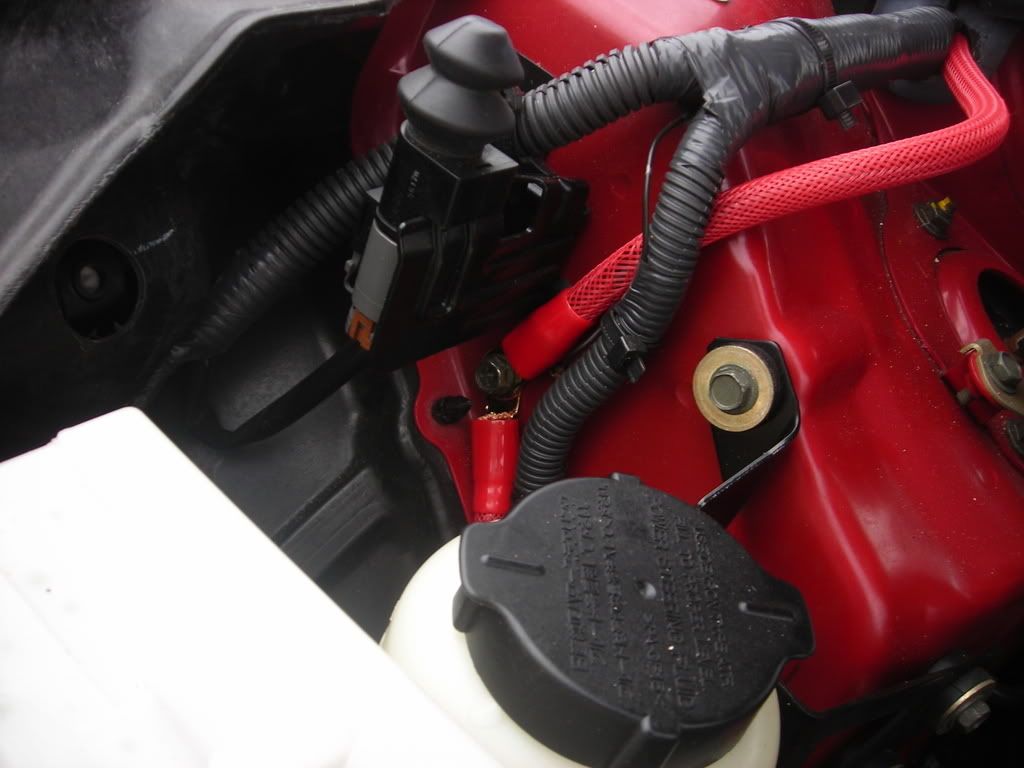
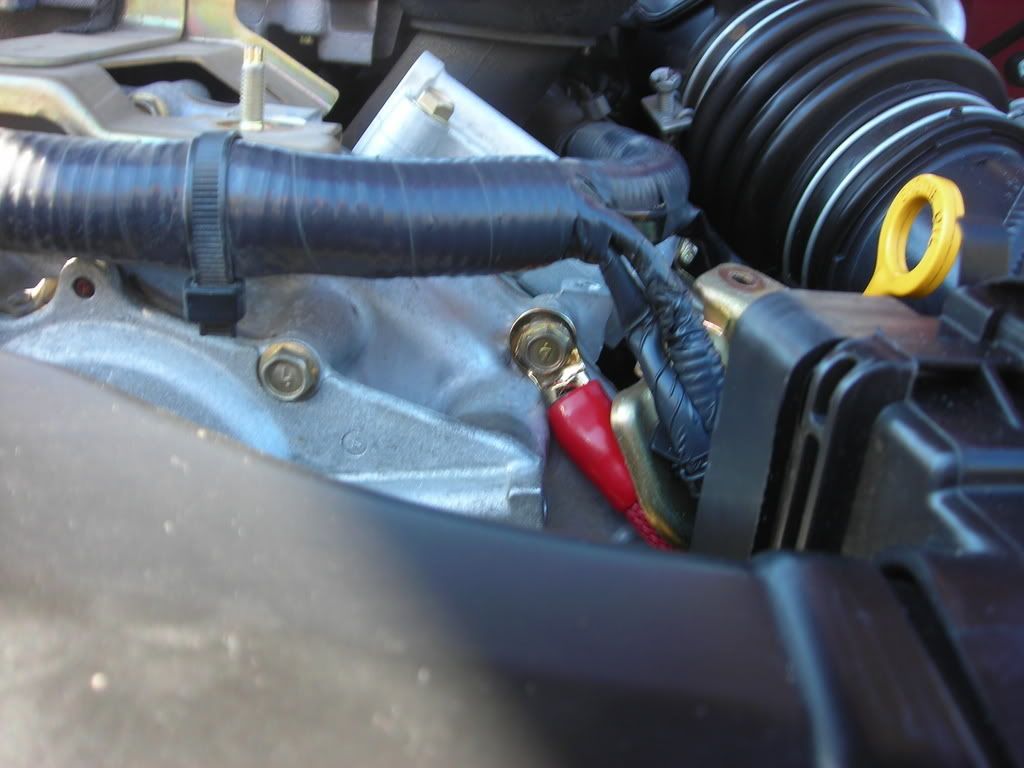
6. Attach the other end of the shorter wire connected to the chassis to the bolt shown here on the front of the passenger side of the engine.
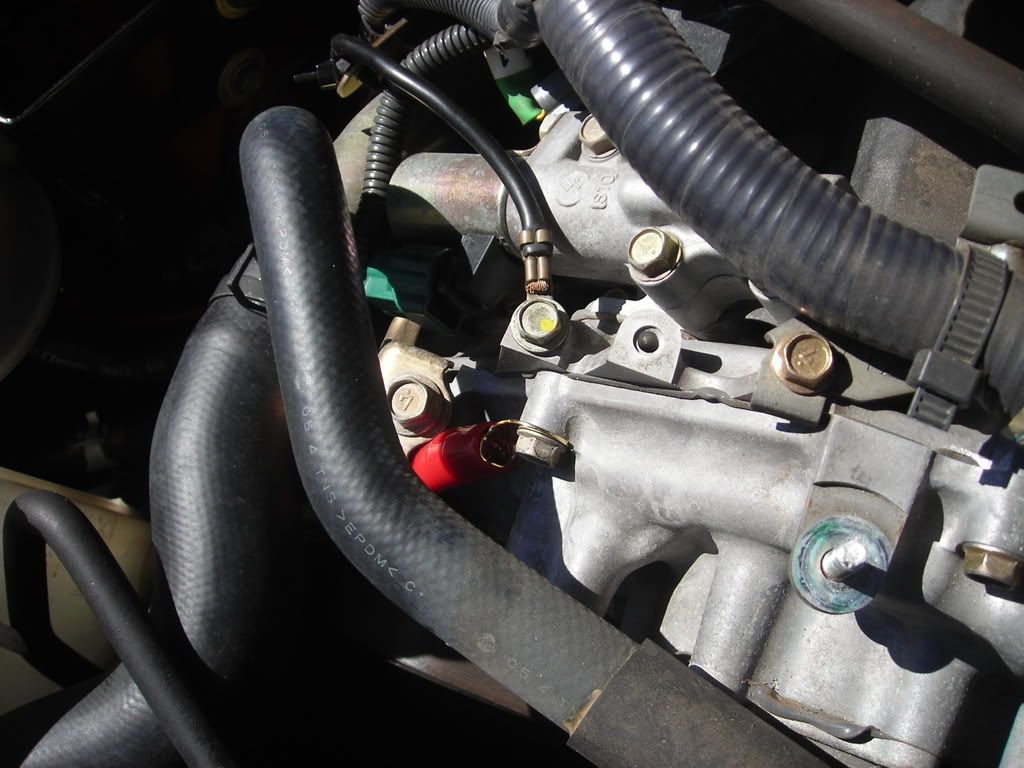
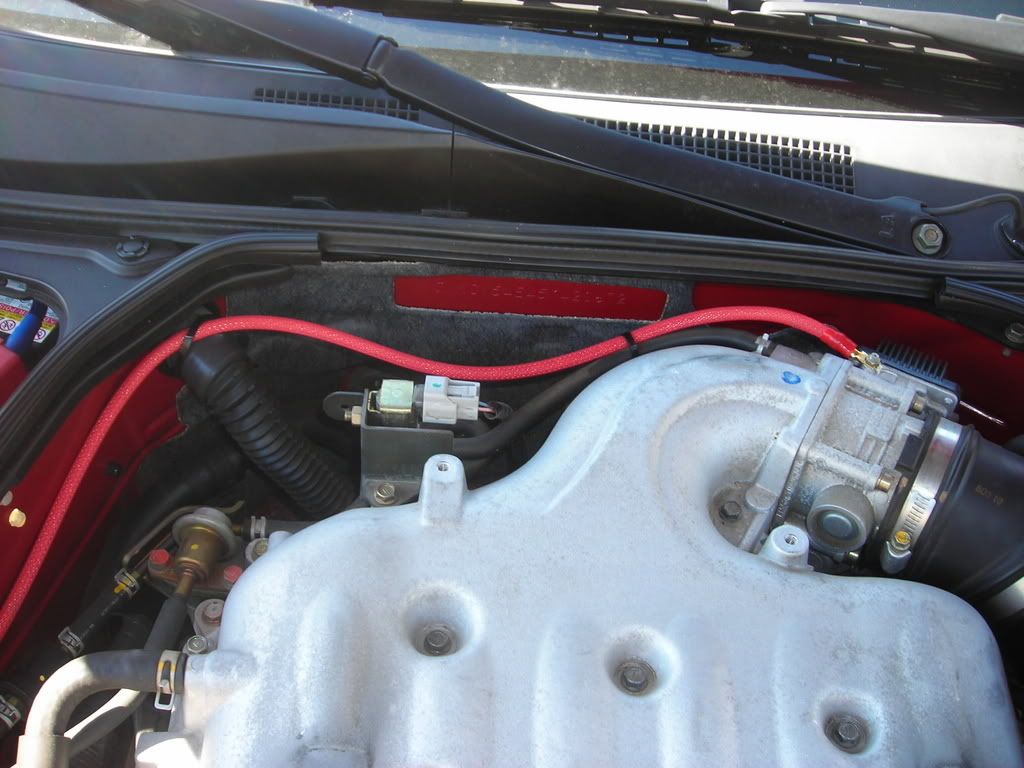
7. Attach one end of the final short wire to the corresponding bolt on the driver side of the front of the engine shown here. Route the wire underneath the intake tubing and bolt the other end to the bolt show on the driver side chassis.
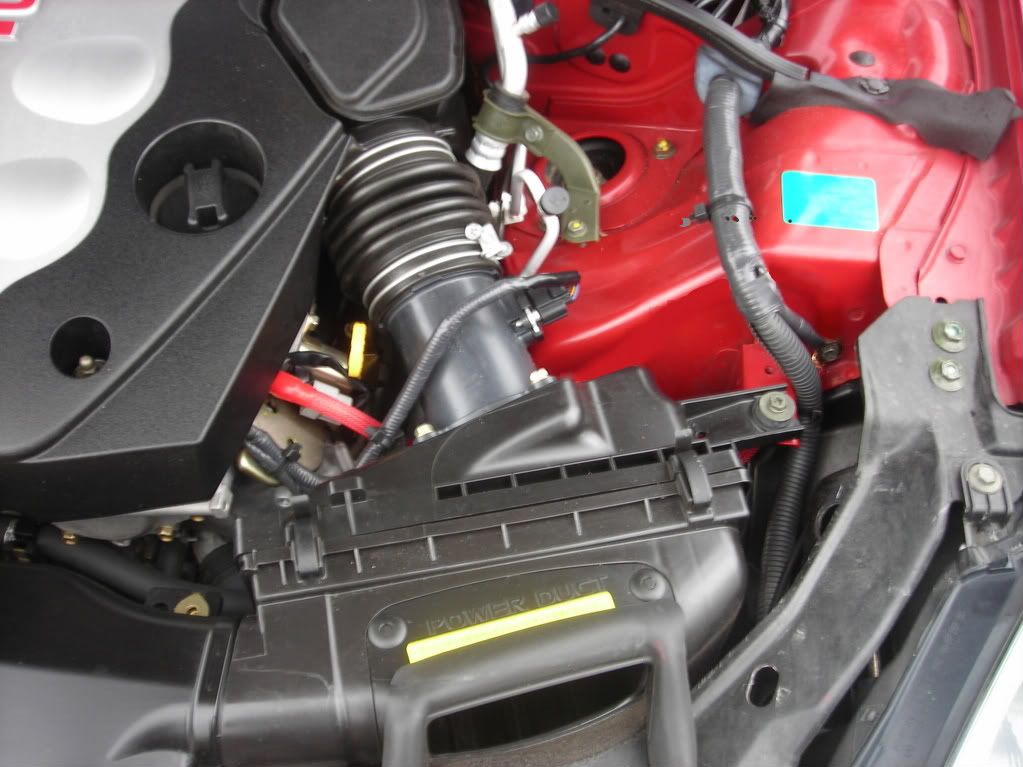
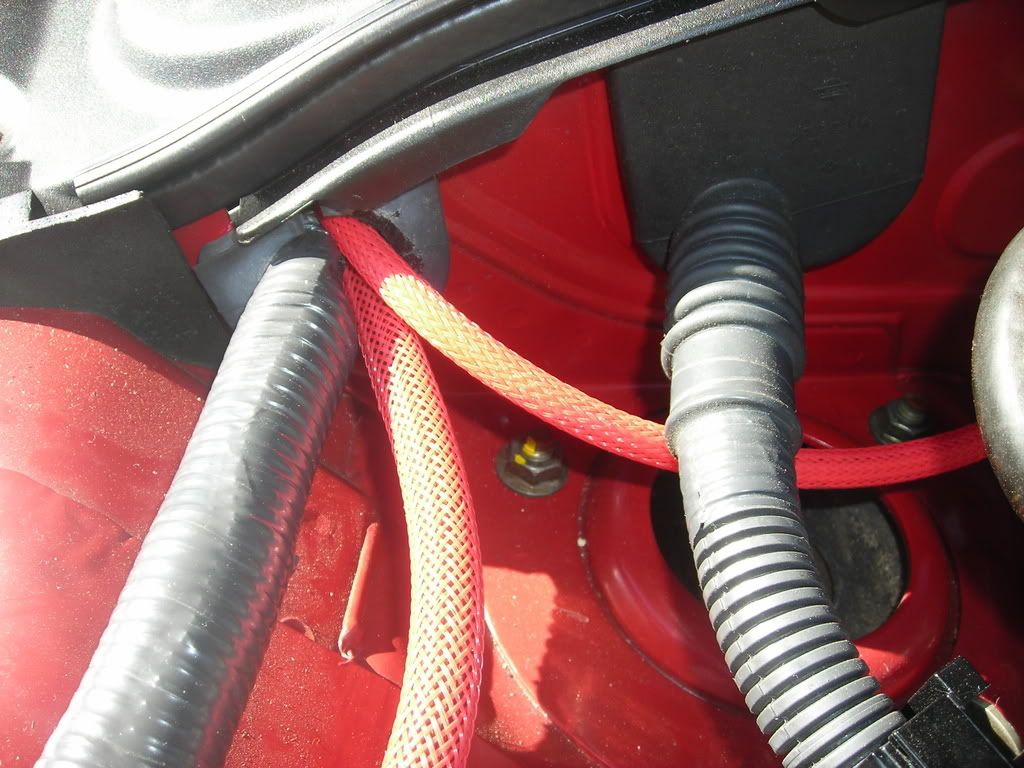
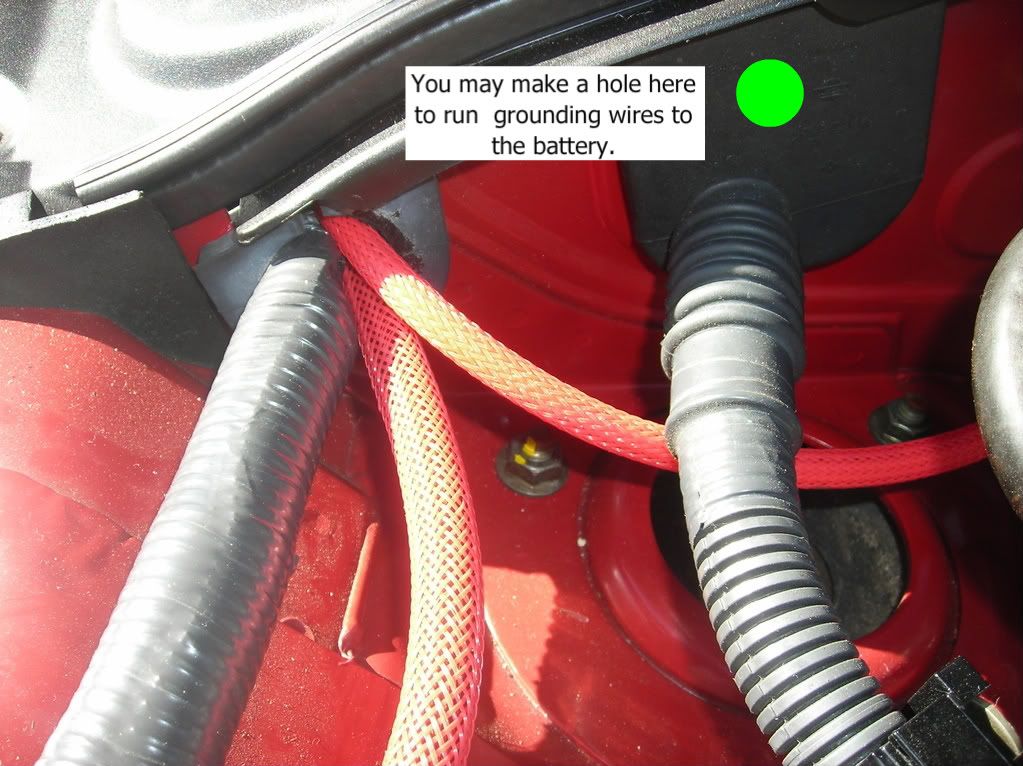
Alternately, you may choose to route the wires into the battery compartment by poking or cutting a small hole through this existing wire grommet as there is more room for them here than through the other one.
8. Attach both wires to the negative battery terminal.
13. Voila! You are done. Enjoy.
You will need to reset your windows since your battery has been disconnected. To perform a window reset, start your car then hold down the driver side window button until the window goes all the way down and then continue for another 20 seconds. Do the same when rolling it up. Repeat on the passenger side window. You'll may also need to reset your radio station presets.

Huge thanks go out to NaiveRapture on G35Driver for the installation photos.

DISCLAIMER: This set of wires is purchased and used solely at your own risk. I will not be held responsible or liable for any harm or damage that comes to your car or to you. What you are installing is a set of wires, nothing more. Take every reasonable precaution for safety when installing. Use good judgment and common sense. Installation of the Betty's Garage Grounding Wires do not necessarily void your factory warranty on electrical components in your car unless it can be proven that they are the cause of the malfunction. With proper installation, they will not be.
Tools needed:
- 10 mm socket
- 8 mm socket
- ratchet
- short extension or a deep 10 mm socket
- 5 mm Allen wrench
All bolts shown are 10 mm except on top of throttle body which is 8 mm.
1. DISCONNECT THE NEGATIVE BATTERY CABLE! You should always disconnect the negative battery cable before doing anything electrical on your car. Always!
2 Remove the engine cover.
3. The longest 8 AWG wire is to ground the throttle body directly to the battery. Connect the end with the spade terminal to the throttle body by loosening the small 8 mm stainless steel nut on top of the throttle body and placing the spade terminal underneath. Tighten the nut back down.
4. Run the cable behind the engine and through the wire grommet into the battery compartment. Don't connect to the negative battery terminal yet.
5. Run the second longest cable from the negative battery terminal through the battery compartment wiring grommet to the point shown in the second photo below to ground the battery to the chassis.
See that tiny black wire grounded here? That is what is grounding your headlights! Pathetic. Remove the bolt and place the end of the grounding wire on top of the black wire that's already there. As you can see from the next photo, one end of another wire will go here as well. Go ahead and bolt the second longest and one end of either one of the shorter wires here.
6. Attach the other end of the shorter wire connected to the chassis to the bolt shown here on the front of the passenger side of the engine.
7. Attach one end of the final short wire to the corresponding bolt on the driver side of the front of the engine shown here. Route the wire underneath the intake tubing and bolt the other end to the bolt show on the driver side chassis.
Alternately, you may choose to route the wires into the battery compartment by poking or cutting a small hole through this existing wire grommet as there is more room for them here than through the other one.
8. Attach both wires to the negative battery terminal.
13. Voila! You are done. Enjoy.
You will need to reset your windows since your battery has been disconnected. To perform a window reset, start your car then hold down the driver side window button until the window goes all the way down and then continue for another 20 seconds. Do the same when rolling it up. Repeat on the passenger side window. You'll may also need to reset your radio station presets.
Huge thanks go out to NaiveRapture on G35Driver for the installation photos.
Last edited by Black Betty; 03-04-2009 at 03:47 PM.
 03-04-2009, 03:12 PM
#2
Posting this in the DIY section because I'm continually asked install questions. I figured I'd post them up here as they continually get buried on the vendor section and this seems like an appropriate place for them.
If you have any specific questions, pleas feel free to post here or send me an email or PM. Thanks all.
If you have any specific questions, pleas feel free to post here or send me an email or PM. Thanks all.

Thread
Thread Starter
Forum
Replies
Last Post
superjoey
D.I.Y. Installations/Modifications
31
03-22-2023 11:56 PM