
Custom Brake Cooling Duct
 04-02-2013, 08:01 PM
#1

Custom Brake Cooling Duct
I started on a little project, took longer than I expected, and definitely drove my wife crazy. But now its all done. Just wanted to share some pictures with you guys.
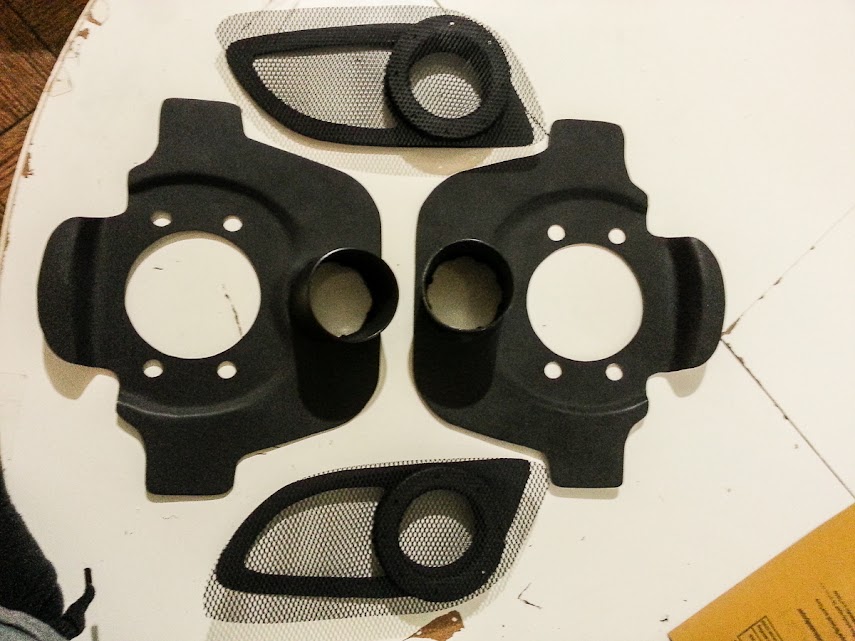
Made out of 6xxx series Aluminum. 2x splash shields. Which will fit directly between steering column and wheel hup.

A closer view, it was dark and flat black is definitely not photo friendly. To step bend the aluminum was real challenge. To give room for the rotor.

Fabricated Flanges and painted flat black as well.
Splash Shield mounted, fit little tight but went in without too much struggle.

I ran duct around back of sus. About 6 1/2 feet of duct per brake.

Duct Mounted to the Flanges. Picture of the dark side. All ugly

Tried to fit hose between the sway bar and the chassis. Did not work. Was too tight.

But settled for running the hose next to sway bars. There is about 1 1/2" room, vs 2 1/2" if you run through the sway bars. About 1 - 2 inches right in front where sway bars is where the tire will rub the hose, if they run next to the chassis. Bit of a challenge to run slightly under, but will not rub the tires. And even with 9.5" wheel no rubbing.Even on a full lock.

Hose when the wheel is fully locked

Back side where the hose meets the shield.

I Cant find another way to run the hose. It is tighter than what I had imagined.

Zip tied the splash shield onto the steering column, so that it wont buckle when I turn the wheel.

Flange mounted, I wasn't fan of Flat Black. But I am starting to like it.

Flat black requires better lighting with my phone camera.

Out in the Sun Light

Shadow

Made out of 6xxx series Aluminum. 2x splash shields. Which will fit directly between steering column and wheel hup.
A closer view, it was dark and flat black is definitely not photo friendly. To step bend the aluminum was real challenge. To give room for the rotor.
Fabricated Flanges and painted flat black as well.
Splash Shield mounted, fit little tight but went in without too much struggle.
I ran duct around back of sus. About 6 1/2 feet of duct per brake.
Duct Mounted to the Flanges. Picture of the dark side. All ugly
Tried to fit hose between the sway bar and the chassis. Did not work. Was too tight.
But settled for running the hose next to sway bars. There is about 1 1/2" room, vs 2 1/2" if you run through the sway bars. About 1 - 2 inches right in front where sway bars is where the tire will rub the hose, if they run next to the chassis. Bit of a challenge to run slightly under, but will not rub the tires. And even with 9.5" wheel no rubbing.Even on a full lock.
Hose when the wheel is fully locked
Back side where the hose meets the shield.
I Cant find another way to run the hose. It is tighter than what I had imagined.
Zip tied the splash shield onto the steering column, so that it wont buckle when I turn the wheel.
Flange mounted, I wasn't fan of Flat Black. But I am starting to like it.
Flat black requires better lighting with my phone camera.
Out in the Sun Light
Shadow

The following 2 users liked this post by joo030879:
Ivoidwarranties (05-03-2013),
Presto (09-14-2016)


Trending Topics
04-04-2013, 02:22 PM
#8
thank you
Steering feel is the same after all done. However to get to that point was quite challenging.
I will be talking about the driver side wheel Only. Guess passenger side will be exact opposite. When the steering wheel is fully locked on right hand turn, the splash shield hose will pull the hose extending the hose. Now when on a full left hand turn lock, the hose will get compressed. to get the hose length just right is bit challenging, cause if too long, when compressed the back side of the wheel will rub the hose. If too short, not enough hose when the wheel turn pulls the hose.
Also about 3-4 inches to the front of the vehicle, where sway bar brackets are positioned. When the wheel is fully locked for right hand turn. Is the point closest to the inner part of the tire to the hose. Found just enough room if you run the hose just under the chassis will be flush against the inner well and will have about an inch gap between the tire and the hose.

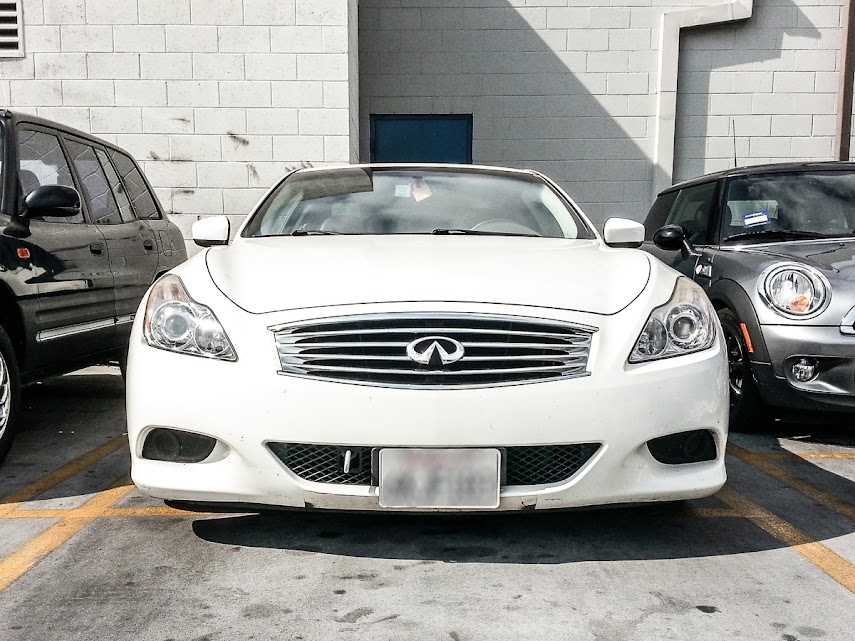
With my 9.5" width wheel and 245/40/19 tires, about 1" gap on full lock in both directions.
I frequently go to a racing track, and yes I have problem with brake fade. Like all cars do. For common track cars like S2K, Evo, STI, and etc. There is commercial available kits. However for Touring car like our G37 it is not available. Well closest one would be the Stillen brake duct kit for 370Z, Have not tried but assumed there was many modification to be made. Also Stillen kit was way above my budget. Found sources online where I could get the parts cheaper, which will better fit my budget. So I was pretty much on my own. Made lot of research, tried a lot and failed like wise. But in the end I did make this work. Driving my wife, two daughters crazy. But my son was right beside me from start to finish. Learned a lot, didn't have a clue when I began. But I am pretty satisfied now. Thank you for your kind words.
Well my next track event is May 4 at Chuckwalla Raceway Park. Where about same time last year. I struggled keeping up with GTS after several laps, when the brakes started to fade. Will post some pictures after the event. And my full review coming soon.
I will be talking about the driver side wheel Only. Guess passenger side will be exact opposite. When the steering wheel is fully locked on right hand turn, the splash shield hose will pull the hose extending the hose. Now when on a full left hand turn lock, the hose will get compressed. to get the hose length just right is bit challenging, cause if too long, when compressed the back side of the wheel will rub the hose. If too short, not enough hose when the wheel turn pulls the hose.
Also about 3-4 inches to the front of the vehicle, where sway bar brackets are positioned. When the wheel is fully locked for right hand turn. Is the point closest to the inner part of the tire to the hose. Found just enough room if you run the hose just under the chassis will be flush against the inner well and will have about an inch gap between the tire and the hose.
With my 9.5" width wheel and 245/40/19 tires, about 1" gap on full lock in both directions.
I frequently go to a racing track, and yes I have problem with brake fade. Like all cars do. For common track cars like S2K, Evo, STI, and etc. There is commercial available kits. However for Touring car like our G37 it is not available. Well closest one would be the Stillen brake duct kit for 370Z, Have not tried but assumed there was many modification to be made. Also Stillen kit was way above my budget. Found sources online where I could get the parts cheaper, which will better fit my budget. So I was pretty much on my own. Made lot of research, tried a lot and failed like wise. But in the end I did make this work. Driving my wife, two daughters crazy. But my son was right beside me from start to finish. Learned a lot, didn't have a clue when I began. But I am pretty satisfied now. Thank you for your kind words.
Well my next track event is May 4 at Chuckwalla Raceway Park. Where about same time last year. I struggled keeping up with GTS after several laps, when the brakes started to fade. Will post some pictures after the event. And my full review coming soon.
Last edited by joo030879; 04-04-2013 at 02:39 PM.
 04-04-2013, 03:18 PM
#10

I think alot more time and effort was put into this than it is actually worth...
I don't think your going to be feeling any sort of difference in regards to braking...but its not always about quantitative results... sometimes its just mental.
I don't think your going to be feeling any sort of difference in regards to braking...but its not always about quantitative results... sometimes its just mental.
04-04-2013, 03:40 PM
#11
Registered Member

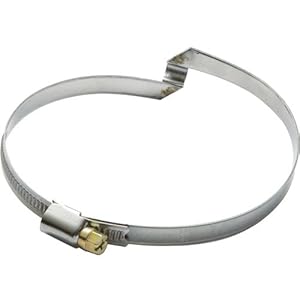
instead of using Duct tape, try getting hose clamps at home depot (like this one Dodge Magnum - Powered Brake Ducts), and tight them down, then spray them redish hoses black
But other than that good DIY
But other than that good DIY
04-04-2013, 05:37 PM
#12
thank you
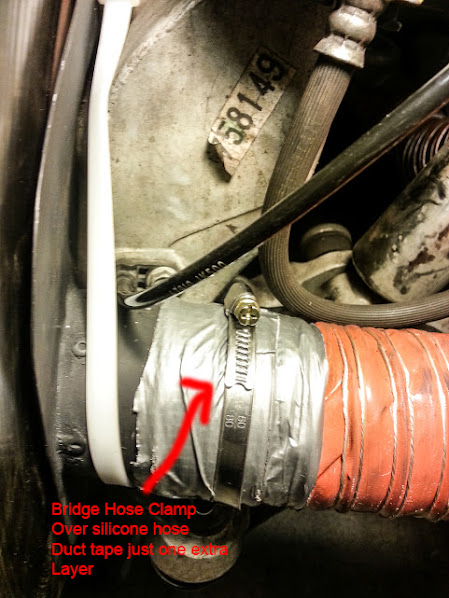
I do agree with you. So duct taped over the silicone hose. And secured with Non-Keyed Bridge Hose Clamps. Picture below.
Now required however silicone hose does not come pre-cut. They are sold either 3', 13', or 24' feet in length. I used Duct taped because before cutting recommended by the manufacturer, so you don't scratch the silicone hose while cutting the hose with hack saw. Left there because I think extra layer of tape over the silicone hose before clamping will not hurt.
Also I do not recommend hose clamp from Home Depot, rather Bridge Hose Clamps, made especially for the metal wire silicone hoses. They will bridge and pass over the metal wire so a better air tight seal when all clamped to the piping.
I guess you didnt see this picture same as above
instead of using Duct tape, try getting hose clamps at home depot (like this one Dodge Magnum - Powered Brake Ducts), and tight them down, then spray them redish hoses black
But other than that good DIY
But other than that good DIY
Now required however silicone hose does not come pre-cut. They are sold either 3', 13', or 24' feet in length. I used Duct taped because before cutting recommended by the manufacturer, so you don't scratch the silicone hose while cutting the hose with hack saw. Left there because I think extra layer of tape over the silicone hose before clamping will not hurt.
Also I do not recommend hose clamp from Home Depot, rather Bridge Hose Clamps, made especially for the metal wire silicone hoses. They will bridge and pass over the metal wire so a better air tight seal when all clamped to the piping.
I guess you didnt see this picture same as above
 )
04-05-2013, 01:59 PM
)
04-05-2013, 01:59 PM
#14
I didn't remove it because its just another layer over the hose. I don't think it will hurt, when all is clamped to the aluminum pipe.
No fitment issues, with or without duct tape.

