When you click on links to various merchants on this site and make a purchase, this can result in this site earning a commission. Affiliate programs and affiliations include, but are not limited to, the eBay Partner Network.
Hey, I had some questions regarding my leaks and if they're what I think they are:
1) I did the rerouting for the passenger side, and when I poured water I noticed that a bit of it was coming down from the ac drain. I don't think this is supposed to happen, so should I just spray compressed air into the tube or maybe try to clean it from the bottom of the car?
2) Others were mentioning the possibility of it also being the weather stripping (@ILM-NC G37S & @Infin88), so I put my phone in the car and hosed it down, where afterward I found the water piling down, as described in this post. I haven't tried this on the driver's side yet but I remember the last time after a heavy rainfall I noticed some water near the fuse box area so it could be the problem there too (HOWEVER, I noticed that some water was near the steering wheel entrance in the middle of the car. I guess I will reroute that drain too to prevent the leak from firewall I'm guessing). The part numbers would be 76861 JL00A (driver) and 76860 JL00A (passenger). Is it as simple as just removing the old weather stripping and clipping the new one in? Also, I can't remember on which post I saw it but I heard that there are 3 different seals or something, where the door plate has to be removed to access the rest?
3) From the previous owner, I've noticed this thing on both sides of the car, which doesn't look normal to me (https://ibb.co/1vGQ2Zg & https://ibb.co/JcX88TG). Should I worry about this?
Re: the AC drain, it looks like you just need to tighten the clamps a little bit more. Did you use a barbed t-fitting like this one:
Do the hoses/tubes fit snugly on the t-fitting?
Also, you shouldn't have any water leaking where the steering column passes through the firewall.
Re: the body/window seals. They will be the easiest to replace as you will not have to remove the interior door panel. It is just a matter of pulling out the old strip, cleaning off the old two-sided tape residue, pressing the new seal in place, closing the door/window, and peeling the backing strip to lock it into place.
It is not hard to do, but it will be tricky. The seal press fits onto a metal strip and getting it to press in takes some finesse.
I have to ask, do you know the full history of this car? Has it ever been wrecked, had the windshield replaced, or anything besides normal wear-and-tear?
Last edited by ILM-NC G37S; 11-04-2020 at 07:43 PM.
Re: the AC drain, it looks like you just need to tighten the clamps a little bit more. Did you use a barbed t-fitting like this one:
Do the hoses/tubes fit snugly on the t-fitting?
Also, you shouldn't have any water leaking where the steering column passes through the firewall.
Re: the body/window seals. They will be the easiest to replace as you will not have to remove the interior door panel. It is just a matter of pulling out the old strip, cleaning off the old two-sided tape residue, pressing the new seal in place, closing the door/window, and peeling the backing strip to lock it into place.
It is not hard to do, but it will be tricky. The seal press fits onto a metal strip and getting it to press in takes some finesse.
I have to ask, do you know the full history of this car? Has it ever been wrecked, had the windshield replaced, or anything besides normal wear-and-tear?
Yeah, I got that same type of T-fitting from Lowe's, and although the 3/8 side fits in, it feels a bit loose but not very loose. Also, I wasn't really talking about the leak from the T-fitting itself as it was very small, but moreso the small puddle next to the actual drain where the ac line goes into.
For the steering column, I think it might have been most likely from my drain tube being loose against the firewall but not sure -- going to have to re-examine it after I've rerouted the driver's side and it has rained.
That sounds a bit tricky so I will most definitely try to get it in snugly. I couldn't see many videos on this being done to the G37 specifically, but it should not be any different if it were done with any other car?
Per the history of the car, I only bought it recently at a private sale with 100k miles, and it doesn't appear to have been in a major wreck nor reported in the files, but maybe it could have.
The thing is, the water is originating from the drain tube itself not at the T-port. So basically after the water comes down from the drain tube it goes through the T port and down to the ac line, where at the exit hole, it leaks a small puddle as if its "overflowing", you get it?
I understand what you are saying, however, if the line was clogged then it would not overflow and puddle "up." A clogged AC drain line would cause the water to back up and eventually overflow from the evaporator. The black AC line goes through and extends past the floor by a few inches where the water drains to the ground. Unless by some chance that AC tube has a cut, or hole, there is no way for the water to backup and flood the floorpan.
For peace of mind you can pull both the AC drain tube and the grommet from the floorpan and apply some silicone to all three pieces.
From your video, it appears that the water is leaking from the clamps, running down the bottom of the black AC tube, and puddling at the grommet. Unless I'm blind as a bat that is how I see it...
Last edited by ILM-NC G37S; 11-04-2020 at 09:10 PM.
Oops, you're right bro, I can't believe I missed that the first time because I was pretty sure that the opposite was happening (where it was leaking from the port). In that case, then yeah, it would just need additional clamping.
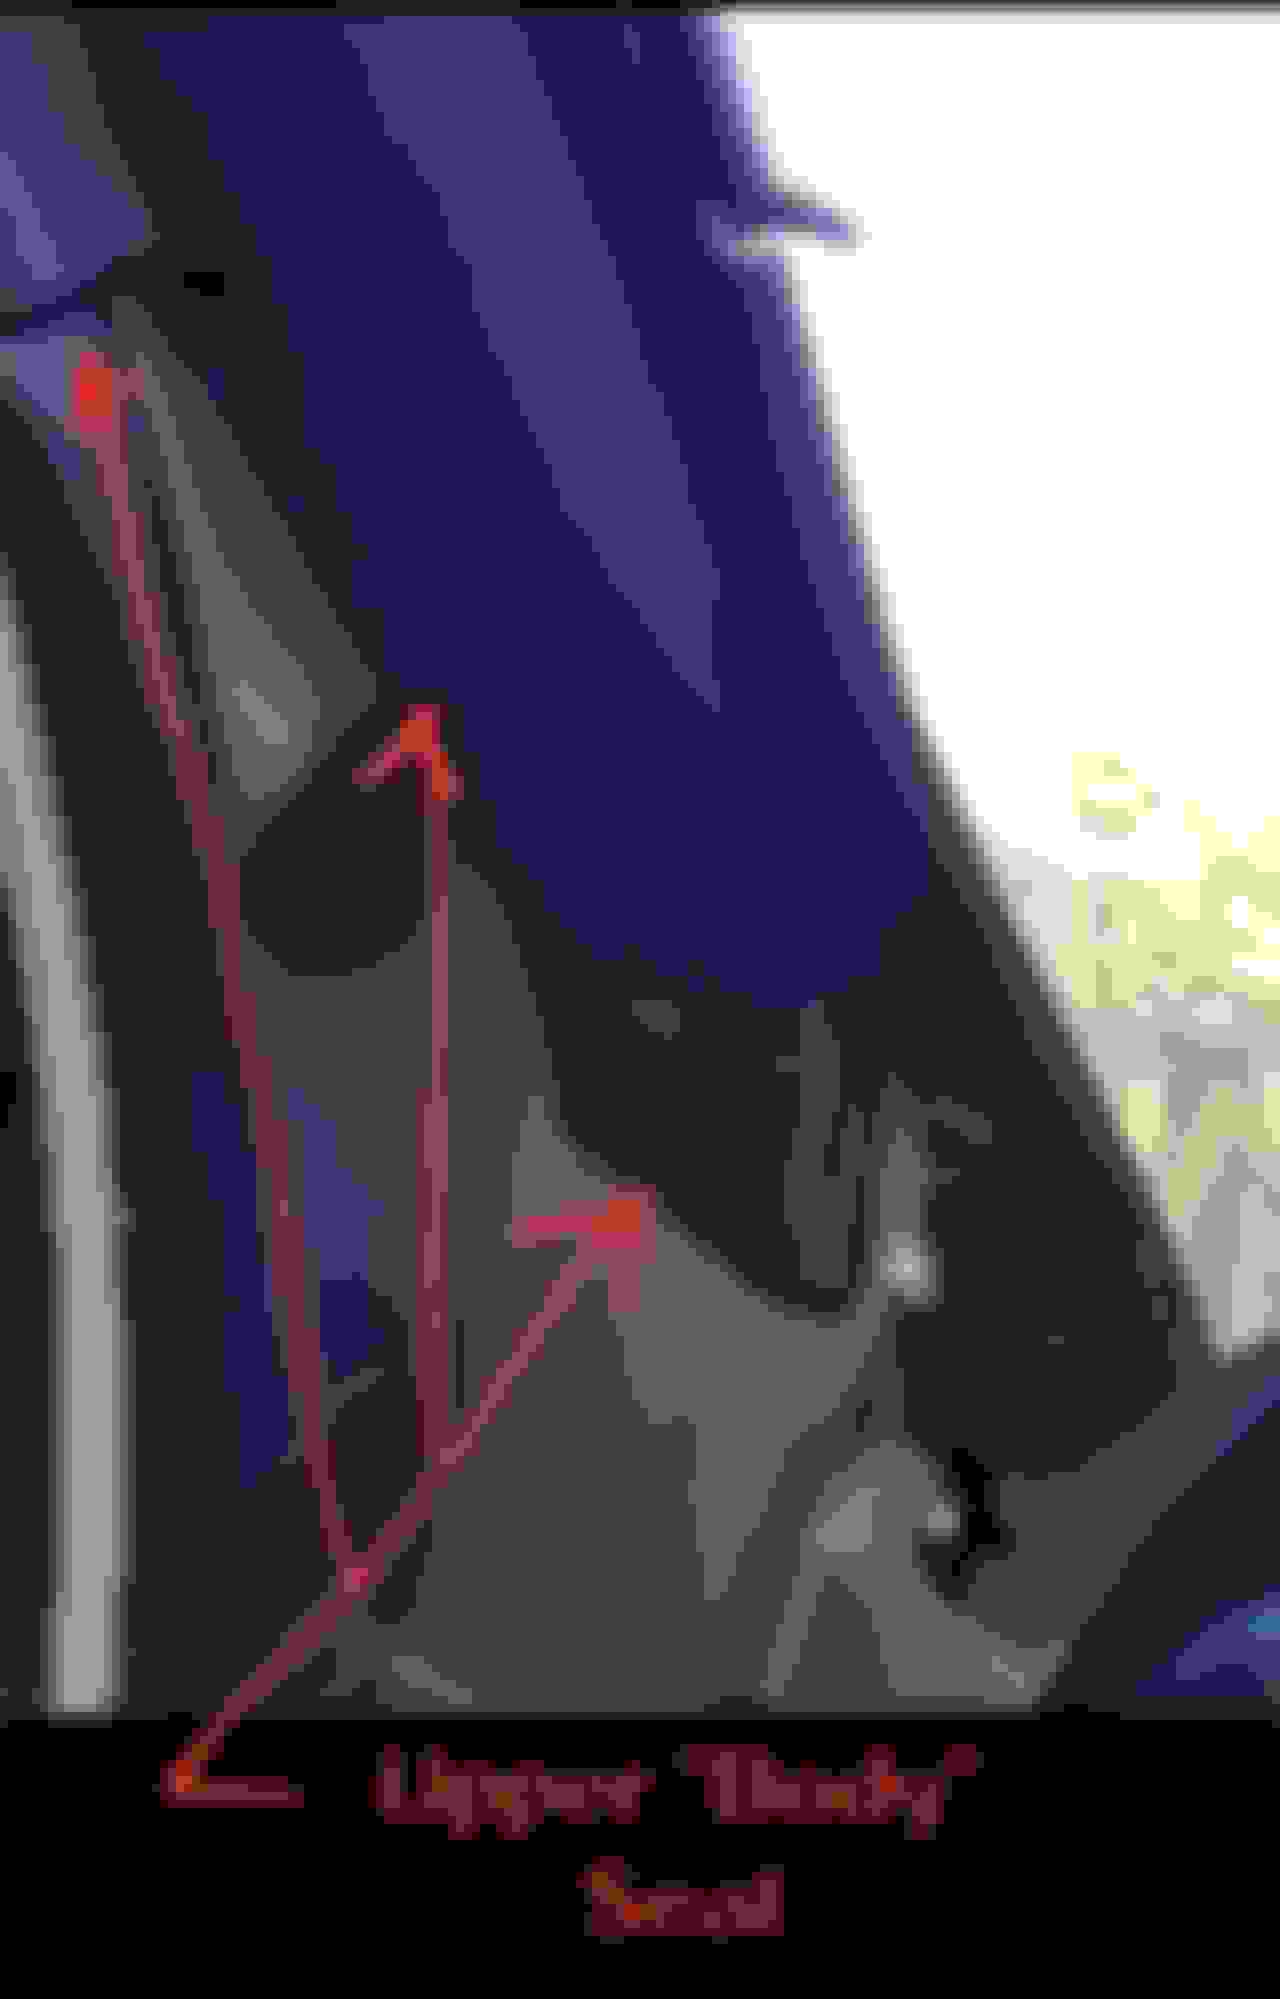
Upper "BODY" Seal- this runs from the front fender well, along the entire top of the window, to the door striker area:
Mirror Support Seal:
Mirror Support Seal (new):
Lower "DOOR" Seal- this runs from the mirror, along the entire bottom of the door to the door striker area (if you look closely you can see the trail where the water was dripping in from the mirror joint):
Never a bother. Sorry for the delay- I got too preoccupied with another mod project. If you end up having to replace the mirror and door seals, the door panel MUST BE REMOVED. The upper body seal you can easily replace. Hope this helps...
While waiting for the upper seal to arrive, I was rereading my posts and noticed that I hadn't shown the driver's side leak with the hose lol. As you can hopefully tell, there seems to be a little bump on the seal which forces the water on to the mini speaker and down the door. It's different from the passenger side in that its trail doesn't fall down to the grayish trim at the bottom right of door (aka different location), but hopefully the stripping can solve it. If not, then I would think it's the mirror tweezer.

 11-04-2020, 06:47 PM