
Blood Red Taillight Project


 12-02-2010, 09:14 AM
#49

No haven't forgot haha, started working on the other light, a little more tricky with the button in the drivers side. I have some before and after pics on the light, just have to get them uploaded when I get a minute. It's been raining non-stop here for 3 days to top it off.
Last edited by DPE G; 12-06-2010 at 05:12 PM.
 12-03-2010, 07:59 AM
#51
Ok so here it is, didn't get a full step by step as I wanted because I was tired and trying to pay attention to what I was doing haha.
First off, finding a line to cut is fairly easy, there is a ledge on the top bottom and sides of the lights, they don't all come to a point in the edges, but it's less than an inch of freehanding at most. All I used to cut them apart was a utility knife, pretty straight forward and easy (at least for me since I use the same blade to cut co-axial cable all the time) The hardest part of the whole process is getting the driver's side light cut around the trunk button. Here are the pics of the housing seperated where you can see the cuts made on the drivers side:

Here you can see the ridge I cut along:

ATTENTION : WHEN YOU GET TO THE BUTTON BE SUPER CAREFUL. I cut it out in two pieces. Around the inner edge closest to the exposed area on the back (tricky to get to and a royal PITA) Then I popped it off the glass, took some firm pressure, but as I was this far in it, tired, and had no better ideas, I got balsy and just pulled. It came off, BUT, IT WILL BE VERY EASY TO CRACK THE LENSE. I tried heating it with no results, no way to get a blade between it, as the chrome housing is being pressed on to the lense side at this time, by this same piece we are trying to remove.

OK this being said, disassemble the LED boards and clear plastic diffusers. You will have to carfully chip away two small melted pieces on the smaller lense to get it off. Careful not to break the pop in tabs. Take it and paint it to you're choice. I chose black simply because it was an easy decision haha. I left the inner reflector of the turn signal chrome to allow it to have the same brightness. You could probably paint this and not notice a HUGE difference. I would love to do another set and try a dark maroon or red to see what the color results would look like. Maybe a little brighter but still get rid of the cherry look of the OEM setup.

Now put all the light circuits and diffusers back in. Melt the two tabs you chipped out with a plastic welder to mushroom the top again. When you put the lense back together be careful not to scratch the painted piece, as it will need to slide into the lense prior to attaching it to the red plastic housing. The lense has a slight lip on it and will only come in or go out at a certain angle. I suggest practicing it a few times BEFORE YOU PAINT, as you will not get a second chance if you gouge it on the way in, after it's painted. You will have to sand and repaint. You can see the lip in the picture above.
If you used the razor blade method, the housing will sit together almost without help, and kind of snap into place. At this point you will need a soldering iron w/a large flat tip or plastic welder. I used a cheap plastic welder from Harbor Freight ($14) so I didn't ruin a soldering iron tip.

If you run the pointed edge at a sloping angle (you will have to play with it to get just the right angle) you will melt it, and as you run down the side of the light, it will "push" the melted plastic down the foot of the iron, and seal itself quite nice. if you get a small pinhole and can't push enough around it, do NOT keep pushing as you only have 1/8" or so of material to use. Either pull it from areas with excess tabs that are not doing anything or seal it with a weatherproof sealant (silicone, rtv, etc) What you get should look something like so. (Minus the opps mark, that comes from your dog running through the cord of the iron haha, grr)

I will not say this is easy or hard. I was going to send mine to 180 to have it done, and the more I thought about it, I just wanted to see how hard it could be. I took the light off and as I was looking at it, I picked up the razor knife and sort of played with the light and after I made the first cut, I just kept going lol. All in all I give it a 9/10 for finished result. I like the look of a darker light, but wanted something different, and that would not loose light output, or have an orange peel finish, that can be scratched easily. (ex: tint, overlays) Not hating, I've had tint on other cars, but the overlays, sheesh, tried to put them on my old G35, and took them off in 10 min, scratched the hell out of them putting them on, don't have the patients for stickers lol.
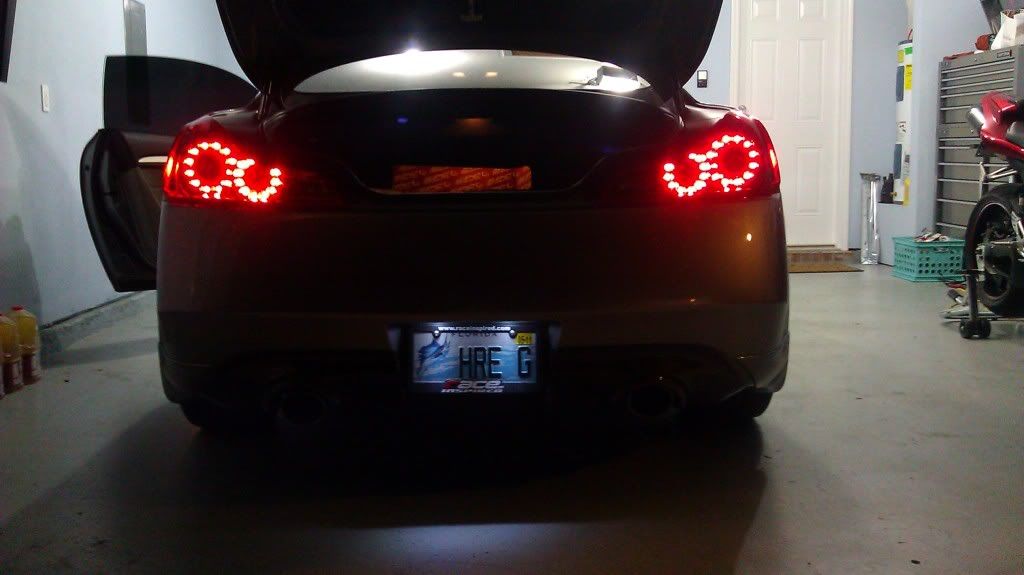
Here is the finished result, NOTE!!! I used silicone around the button to secure that piece of the housing back to the lense because I could not get an iron back in the hole. It goes on white, but takes 7-10 days to turn clear after it cures. SO in the pictures it looks a little pink/lighter in that area, but it will be invisible in a week or so. Didn't notice that on the tube until I started using it and it was white lol.


Here is a comparison (stock drivers side) to show that their is no change in light output.
First off, finding a line to cut is fairly easy, there is a ledge on the top bottom and sides of the lights, they don't all come to a point in the edges, but it's less than an inch of freehanding at most. All I used to cut them apart was a utility knife, pretty straight forward and easy (at least for me since I use the same blade to cut co-axial cable all the time) The hardest part of the whole process is getting the driver's side light cut around the trunk button. Here are the pics of the housing seperated where you can see the cuts made on the drivers side:
Here you can see the ridge I cut along:
ATTENTION
: WHEN YOU GET TO THE BUTTON BE SUPER CAREFUL. I cut it out in two pieces. Around the inner edge closest to the exposed area on the back (tricky to get to and a royal PITA) Then I popped it off the glass, took some firm pressure, but as I was this far in it, tired, and had no better ideas, I got balsy and just pulled. It came off, BUT, IT WILL BE VERY EASY TO CRACK THE LENSE. I tried heating it with no results, no way to get a blade between it, as the chrome housing is being pressed on to the lense side at this time, by this same piece we are trying to remove.OK this being said, disassemble the LED boards and clear plastic diffusers. You will have to carfully chip away two small melted pieces on the smaller lense to get it off. Careful not to break the pop in tabs. Take it and paint it to you're choice. I chose black simply because it was an easy decision haha. I left the inner reflector of the turn signal chrome to allow it to have the same brightness. You could probably paint this and not notice a HUGE difference. I would love to do another set and try a dark maroon or red to see what the color results would look like. Maybe a little brighter but still get rid of the cherry look of the OEM setup.
Now put all the light circuits and diffusers back in. Melt the two tabs you chipped out with a plastic welder to mushroom the top again. When you put the lense back together be careful not to scratch the painted piece, as it will need to slide into the lense prior to attaching it to the red plastic housing. The lense has a slight lip on it and will only come in or go out at a certain angle. I suggest practicing it a few times BEFORE YOU PAINT, as you will not get a second chance if you gouge it on the way in, after it's painted. You will have to sand and repaint. You can see the lip in the picture above.
If you used the razor blade method, the housing will sit together almost without help, and kind of snap into place. At this point you will need a soldering iron w/a large flat tip or plastic welder. I used a cheap plastic welder from Harbor Freight ($14) so I didn't ruin a soldering iron tip.
If you run the pointed edge at a sloping angle (you will have to play with it to get just the right angle) you will melt it, and as you run down the side of the light, it will "push" the melted plastic down the foot of the iron, and seal itself quite nice. if you get a small pinhole and can't push enough around it, do NOT keep pushing as you only have 1/8" or so of material to use. Either pull it from areas with excess tabs that are not doing anything or seal it with a weatherproof sealant (silicone, rtv, etc) What you get should look something like so. (Minus the opps mark, that comes from your dog running through the cord of the iron haha, grr)
I will not say this is easy or hard. I was going to send mine to 180 to have it done, and the more I thought about it, I just wanted to see how hard it could be. I took the light off and as I was looking at it, I picked up the razor knife and sort of played with the light and after I made the first cut, I just kept going lol. All in all I give it a 9/10 for finished result. I like the look of a darker light, but wanted something different, and that would not loose light output, or have an orange peel finish, that can be scratched easily. (ex: tint, overlays) Not hating, I've had tint on other cars, but the overlays, sheesh, tried to put them on my old G35, and took them off in 10 min, scratched the hell out of them putting them on, don't have the patients for stickers lol.
Here is the finished result, NOTE!!! I used silicone around the button to secure that piece of the housing back to the lense because I could not get an iron back in the hole. It goes on white, but takes 7-10 days to turn clear after it cures. SO in the pictures it looks a little pink/lighter in that area, but it will be invisible in a week or so. Didn't notice that on the tube until I started using it and it was white lol.
Here is a comparison (stock drivers side) to show that their is no change in light output.
Last edited by DPE G; 12-06-2010 at 05:14 PM.

 12-04-2010, 10:38 PM
#55
Thanks for putting the effort to write up on it man! been waiting for this. taillights looks great man. Those are really nice R34 taillights LOL Seems like a PITA to DIY though.. specially for people who have no skills like me haha
12-05-2010, 10:18 PM
#56
Registered User
iTrader: (1)

Join Date: Sep 2008
Location: Sin-City, Guam
Posts: 454
Likes: 0
Received 0 Likes
on
0 Posts
Thanks for the write up and daring effort to attempt this on your own...
I will be doing this mod as soon as the rainy weather clears up over here on Guam... Thanks again bro !
I will be doing this mod as soon as the rainy weather clears up over here on Guam... Thanks again bro !

 12-06-2010, 07:22 AM
#59
MyocyteX - Haha yes I work at a Motorola MSS shop, and I'm pretty sure I dream of subscribers and systems lol ugh tired of looking at them all day!
kRAM - Each light took about 30-45 minutes to cut open. It is very easy. The only "hard" part of the whole process was getting the button trim off without breaking anything.
kRAM - Each light took about 30-45 minutes to cut open. It is very easy. The only "hard" part of the whole process was getting the button trim off without breaking anything.
